Today’s topic is about as sexy as a computer IT technician explaining how a web server works.
But I’m not sorry for bringing it up. Because PEX pipe is to your RV freshwater system what arteries are to your circulatory system. Without plumbing, nothing moves.
If you’re looking to save time or money repairing your own RV plumbing, then this guide explains how to repair PEX. You have several options – some of which don’t even need any special tools!
This guide isn’t just for the nerds. Even if you don’t consider yourself a “DIYer,” you should grok the fundamentals of your RV water supply system. Armed with basic knowledge, you can troubleshoot emergencies or repair basic problems.
After all, knowing how to tighten a hose clamp could mean the difference between a catastrophic flood and an annoying drip-drip!
Lastly, don’t get intimidated. This is a long article just because I’m covering so many methods. The easiest method (Option 4) takes no tools, no special knowledge, no hand strength, and almost no time! Working with PEX really is pretty easy.
Getting Started with PEX Tubing
Learning the Basics
If this is your first time working with PEX, I recommend you start with my FAQ Guide to PEX tubing! That will introduce you to common PEX sizes, uses, and restrictions.
PEX is the most commonly used type of pipe or tubing in an RV freshwater distribution system. It’s sold in spools in white, blue, and red colors.
Here’s a good reference guide from Nibco about how to install PEX for residential applications. Once you’re ready to tackle your project, come back here!
Accessing PEX in an RV
When repairing PEX pipe in an RV, the biggest challenge can be accessing it in the first place!
Per RVIA code, PEX and PEX joints cannot be hidden inside walls, ceilings, or other structural assemblies in your RV. However, you may need to remove access panels, relocate furniture, and contort your body while on your stomach to access a particular tube or fitting!
I wish I could offer you some detailed helpful advice, but the best thing is to contact your manufacturer and ask for a diagram or blueprint. If the plumbing is “hidden” below your subfloor, you may need to remove the entire underbelly, dig out some insulation, unscrew a couple components … it all depends on the RV.
PEX Plumbing Gear List
Here are some tools you might find helpful when working inside small areas inside your RV:
- Flashlight (or headlamp)
- Needle-nose pliers
- Vise grips
- Telescoping mirror
See the options below for specific tools for your chosen installation method. Most methods require:
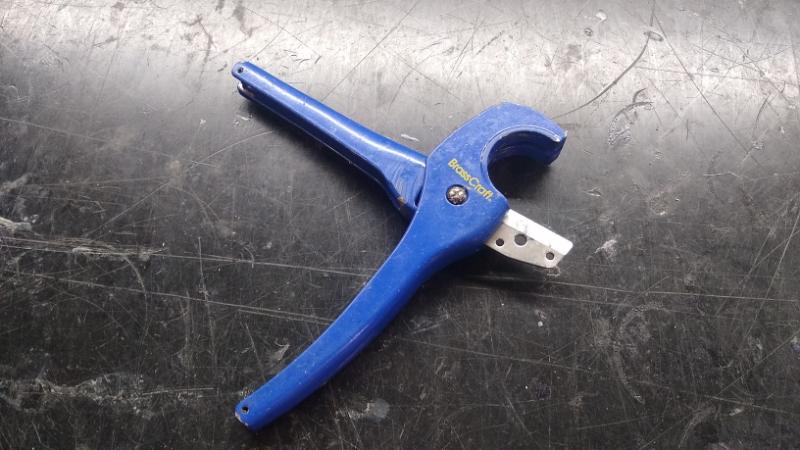
- A PEX tube cutter (handheld or battery-operated)
- PEX deburring tool (or razor blade)*
- Measuring tape
*A PEX deburring tool is especially useful if you’re using stab-in fittings! These DIY-friendly fittings are VERY sensitive to burrs or out-of-square cuts!
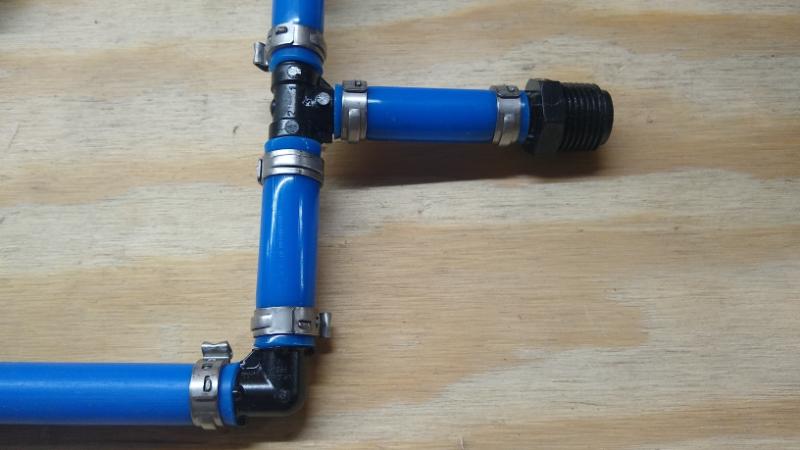
Option 1: Cinch Clamps
Meet the star of the show: A stainless steel band with an “ear” that, when clamped, cinches the band around the tubing!
This is THE system used by most RV manufacturers. It’s fast, reliable, and affordable. (You’ll hear these clamps referred to as Oetiker clamps.)
The big advantage of cinch bands compared to crimp rings (see Option 2) is that you only need one-sided access! So long as you can get the tool jaws onto the ear and bear down, you can make it work.
However, they’re still designed for assembly line and automotive operations, not DIY retrofits. Plus, you need special tools. If you’re renovating or fixing your RV, you might be better off with a push-to-connect fitting (see other options).
At a minimum, you’ll need:
- Cinch ring clamp tool
- PEX shears (for cutting the pipe square)
- End cutter (for removal)
A small torch lighter REALLY comes in handy when removing PEX from a fitting. When heated, PEX expands, and it will easily slip off a fitting. (This will save you much cursing and tugging with the pliers if you’re fixing your RV!) If you don’t have a torch lighter, use a hair dryer, cigarette lighter, or heat gun.
Installing PEX in an RV couldn’t be easier using conventional tools.
- You measure (twice!) and cut PEX to the length required.
- Shear the ends of the PEX pipe (make sure the ends are square for best fit!)
- Slide a cinch clamp ring onto the pipe, and then push the pipe onto the fittings.
- Use the clamp tool to clamp the ring about 1/8″ from the end of the pipe.
- You’re done!
If you need to remove a cinch clamp, use an end cutter to snip the ear and twist until the clamp loosens.
If you’re cheap, you can substitute more common tools – but the work gets a lot harder! You can use a super-sharp utility knife instead of a PEX cutter and vice grips rather than a clamping tool, but you’re taking a big risk. Your fitting joint needs to survive 80-100 psi testing. A bad crimp probably won’t.
Option 2: Crimp Rings
Copper crimp rings are a tried n’ true method of assembling PEX tubing onto brass fittings.
- Slide the copper crimp rings over the tube and assemble the joint.
- Use a PEX crimping tool (with the correct jaws) to crimp, or swage, the ring over the tubing.
- The PEX will slightly deform over the fitting barbs, creating a watertight connection.
- Check the crimp with a Go-No Go gauge.
- You’re done!
Crimped PEX joints are reliable, simple, and affordable. The crimp rings don’t cost more than a quarter!
You don’t see this system on most RVs, though. That’s for two reasons:
- They’re a royal PITA in small spaces. The jaws of the tool must completely enclose the copper ring, and you must squeeze all the way!
- They’re a little sensitive. The crimping tool must be perpendicular to the pipe. You need to squeeze all the way.
- They’re difficult to remove. If you mess up a crimp deep inside a cabinet, good luck!
Option 3: Expansion Fittings
Unless you’re a professional plumber specializing in commercial installations, you probably won’t use expansion fittings. They’re amazing, and arguably one of the best methods for fitting PEX, but can be a challenge for DIYers. They also require PEX-A tubing.
And even if you are a professional plumber… good luck with expansion fittings. It’s almost impossible to wield the bulky tool inside the confines of an RV cabinet. If you choose to use expansion joints, you’re a better man than me!
Option 4: Sharkbite Push-to-Connect Fittings
If you’re not mechanically inclined, or you don’t want to purchase (or store) new tools, then you can use push-to-connect (stab-in) fittings instead.
SharkBite fittings are probably the most popular choice on this list – and for good reason! You really just push to connect them. No tools necessary. It’s like magic! And they can be removed with a simple tool!
The main downside is their cost. There is also some concern about how well they last long-term. SharkBite fittings – and all similar stab-in push-to-connect fittings – really on tiny teeth, an O-ring, and system pressure to lock the tubing in place. With all the vibrations of a moving RV, and all the pressure fluctuations during use, there is some concern about the tubing working itself loose.
But I can’t think of an easier solution for aftermarket repair.
SharkBite fittings dominate the aftermarket. But there are other worthy brands as well:
- SharkBite
- Nibco PUSH N GO
- Airtac
- Bluefin
- Gatorbites
- John Guest Pro Lock
All of these brands offer simple, reliable push-to-connect PEX fittings. Some of them, like John Guest Pro Lock, require a second step (such as a half-turn) to lock and unlock the fittings.
Option 5: Flair-It Compression Fittings
Flair-It fittings are another excellent option for DIY repair. These are the fittings you’ll usually see sold at RV parts stores.
These fittings are really easy to install. You just slide the PEX tube onto the fitting and twist a threaded nut onto a compression ring to make the seal.
Compression fittings are affordable and long-lasting. They can be a little finicky, though. Don’t over- or under-tighten them. And sometimes, the O-ring gasket inside the fitting can fail and create a small water leak.
The downside of a compression fitting vs a Sharkbite fitting is you need a tool to rotate the compression nut. This tool is cheap (some people just use channel lock pliers), but you might not have much room to rotate the connection! If so, just go with a push-to-connect fitting.
A lot of RVers keep a bag full of compression elbows, tees, and couplers in their maintenance drawer. And that’s a great idea! They are easy to install and pretty affordable.
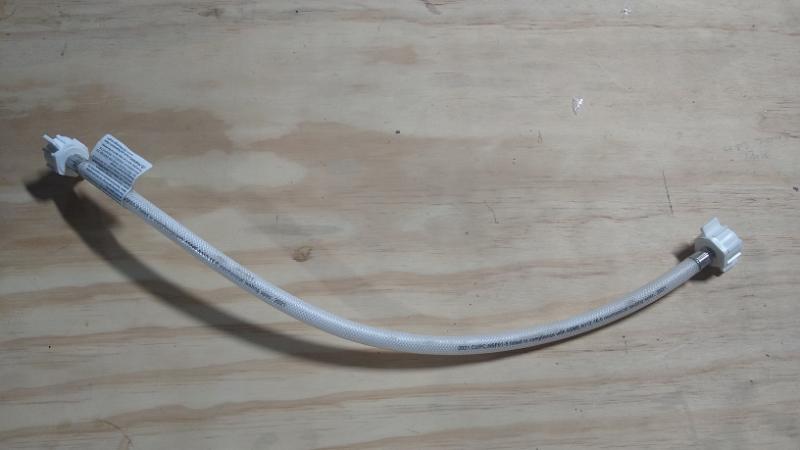
Option 6: Switch to Braided Vinyl Hoses
I’ll save the details for a future article, but many DIY RVers dispense with the PEX altogeter and go with stainless steel flexible hoses or high-pressure vinyl hoses. These hoses are premade and connected with threaded (FIP/FPT and MIP/MPT) fittings.
If you need to replace a lot of PEX, especially in a tight area with lots of elbows and tees, you may find switching to flexible hoses is a LOT easier.
See? Not so bad!
If I was repairing just a handful of fittings in my RV, I’d choose Option 4 or 5: Sharkbite (or similar brand) or Flair-It fittings. They’re just so DIY friendly! If you realized you screwed up, they’re easy to fix.
If I was overhauling my plumbing, I’d choose Option 1: Cinch clamps. I like them because:
- They only require one-sided access
- There’s no need for a go/no-go gauge (once your jaws close all the way, you’re done!)
- Once you buy the clamping tool, the rings themselves are pretty affordable.
- It’s not too hard to remove a bad clamp ring and reinstall.
There you have it! PEX repairs in a nutshell!
Leave a Reply