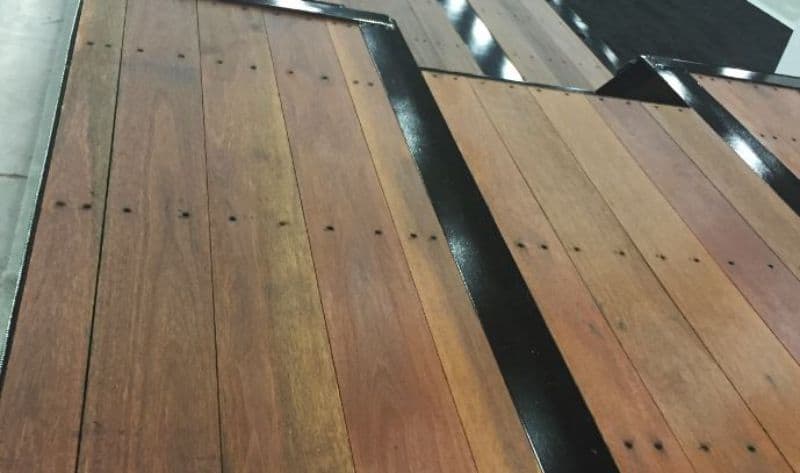
Let’s take a break from our regularly scheduled programming about RVs and look at their close cousins, the utility trailer!
Are you about to replace the wooden decking on your trailer? Most trailers with wooden decking will eventually require replacement. Wood, even pressure-treated wood, can crack, break, dry rot, warp, or fall prey to termites and other insects.
You can extend the lifespan of your flooring using a deck and siding stain, as I suggested in our Guide to Best Options for Trailer Decking.
But when it comes time to replace your decking, the screws you use are important. So what screws are best for trailer decking?
Choosing the Best Fasteners to Attach Trailer Flooring
In this post, we’ll go through the two basic options for fastening a wooden deck to your trailer frame: screws and bolts. Then I’ll share my tips and tricks for an easy installation – and hopefully you won’t have to use the angle grinder!
Getting Started
Generally, when you install new trailer decking, you will be screwing or thru-bolting 2×6, 2×8, or 2×8 planks to the trailer angle or C-channel crossmembers. The edges of the floor are usually captured within a U-channel and do not require additional fasteners.
Before you install the new flooring, you should consider if you need to paint or refinish the trailer frame.
You will need several tools, including:
- 1/2″ impact driver
- 1/2″ drill
- Pilot hole drill bit
- Clearance hole drill bit
- Hammer/mallet
- Chop saw
- Countersunk/counterbore bits
- #40 Torx bit
How Many Screws Will I Need?
You should plan on 2 screws at every crossmember per plank. Depending on your trailer frame design, you may require more at the ends. Buy an extra 10% to account for any broken screws.
How to Remove the Old Screws?
If you’re replacing decking in very poor condition, the original screws may be rust-seized to the crossmembers. You can try:
- Soaking the old screws with a penetrating fluid
- Heating the area with a propane torch
- Backing them out using an impact driver.
If worse comes to worst, you may need to grind them off with an angle grinder and cutting wheel. You will not be able to use the old screw hole, but don’t worry about that – just use self-drilling and self-tapping screws instead.
Best Screws for Trailer Floor Decking
Screws are more light-duty fasteners than bolts, but they can be very quick to install, remove and replace.
There are two common options for trailer flooring screws:
1. Self-Tapping Trailer Decking Screws
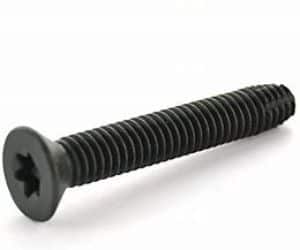
These workhouse screws feature a countersunk flat head for flush installation and self-cutting threads to tap into hard metals, like steel.
They require a pre-drilled pilot hole and clearance hole, since they are usually full-thread.
- You can purchase these screws with either 1/4” or 5/16” diameter. Go for the larger diameter if possible.
- You will also see these screws referred to as cutting screw Type F.
- These screws are normally installed with a #30, #35, or #40 Torx head driver.
- You can purchase these screws at a semi-trailer parts store, some RV stores, and at online retailers.
2. Trailer Wood-to-Metal Reamer TEK Floor Screws
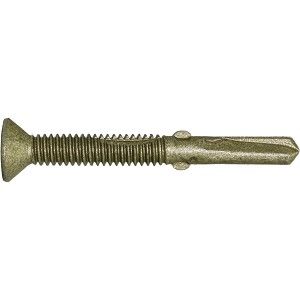
If you’re installing regular pressure-treated wood into 14-11GA steel, these screws are an upgrade over the more common self-tapping floor screws. They are easier and faster to install.
Wood-to-metal screws have a self-drilling point combined with self-cutting threads to both drill and tap a mounting hole. Snap-off “wings” above the drill point automatically drill a clearance hole through the wood deck and snap off in contact with the harder metal.
- Most of these trailer floor screws require a Torx (star) T30 or a Phillips P3 drive.
- Even though manufacturers suggest these screws can be used in ¼” steel, in our experience, anything thicker than 11GA (1/8″) should use pre-drilled pilot holes.
- If you’re using pressure-treated lumber, ensure your fasteners have a coating rated for outdoor contact with pressure-treated lumber, most commonly ACQ rather than the outdated CCA.
- If you’re installing a plywood decking, you may use a smaller, shorter #12 x 1-5/8 version of these screws.
How to Install Trailer Decking Screws
If you’ve never installed trailer decking before, here are a few tips and tricks:
- Clean out the clearance holes. Ensure the clearance holes are free of wooden sawdust and metal shavings. Shavings can increase friction or even cause the screw to bind in the hole.
- Use a lubricant. Some screws will come waxe or oiled to ease installation. Others may need to be sprayed with a penetrating fluid or a light threadlocker. Dry metal-on-metal friction can rapidly cause galling, which can cause screw heads to snap off.
- Bring a big gun. We recommend a beefy ½” drill and impact driver. If using cordless, have several batteries on standby, because you’ll go through them quickly!
P.S. I also found an excellent guide at TrailerDecking.com which has lots of pictures showing how to install Type F trailer decking screws.
The most important part of installing a screw is properly sizing the pilot and clearance holes.
How to Drill a Pilot Hole
- The pilot hole is drilled into the frame. It should be approximately the size of the inner diameter of the screw.
Self-drilling screws (also called TEK screws) make their own pilot hole. Other screw types, such as Type F, do not. You will have to drill a pilot hole separately.
Note that self-drilling is NOT the same as self-tapping. A self-drilling screw can make its own pilot hole and cut its own threads. A self-tapping screw can only cut its own threads in a predrilled hole.
Drill pilot holes first, then clearance holes. Using a self-centering HSS or coated titanium or cobalt bit designed for mild steel is a requirement; softer bits will quickly dull. Use a cutting fluid, apply high pressure, and keep the feed speed low.
You may need a corded drill or impact driver for this process. Some battery-powered drills struggle to drill through 1/8″, 3/16”, or 1/4″ thick steel.
How to Drill a Clearance Hole
- The clearance hole is drilled into the decking. It should be approximately the size (or just larger) than the outer diameter of the screw.
Only Reamer-type screws can drill their own clearance hole. In almost all cases, you will need to drill a clearance hole separately.
A common mistake is to make the pilot hole and the clearance hole the same size. This is wrong! A clearance hole should allow the entire screw (except the head) to slide through. This allows the screw to tightly clamp the decking to the frame. If the threads accidentally engage with both the frame and the decking, then the joint will not clamp tightly, and you will be left with gaps.
If installing a particularly hard or dense flooring like ipe, oak, or aphitong wood, you will need to bevel the clearance hole with a tapered bit. In softer woods, the screw head will naturally depress the wood around it.
Screw heads should be recessed 0.5-2mm or so. You don’t want any screw heads poking up through the floor!
FAQ: Can You Use Regular Construction Screws to Attach Trailer Decking?
Unfortunately, most of the regular construction screws at your local home improvement stores are not suitable to install trailer flooring.
- Most construction screws are too brittle for use on a trailer. They break before they bend. They will snap due to road vibrations and eventual fatigue.
- Also, most construction screws are designed for wood or sheet metal, not thick metal plate. A trailer flooring screw has a very fine thread for installation into a steel frame.
- General construction screws are usually size #8, #10, or #12, which are too small for trailer flooring. 1/4″ diameter should be the minimum; 5/16” is even better.
- And finally, many generic construction screws lack an appropriate finish. Trailer flooring screws are designed for 24/7 outdoor exposure, and most are even compatible with pressure-treated lumber.
Do not use regular construction screws for securing your decking! Invest in your trailer, and it will return the favor.
Best Bolts for Trailer Floor Decking
Bolts are the heavy-duty solution for floor fastening. They are easily removable and replaceable.

The most common option is carriage bolts with lock nuts.
Use 5/16” or 3/8″ bolts and nuts. Grade 2 or Grade 5 is usually sufficient for most light- and medium-duty trailers. The length should be long enough that at least twice the pitch of the thread is beyond the nut.
The square shank underneath the head of a carriage bolt locks the head when hammered into a smaller round hole, allowing you to torque the fastener from one side only. Remember not to oversize the clearance hole, or the square base won’t hold!
You will need access to the underside of the frame to thread on the nuts and washers. Standard SAE or USS washers will work fine.
- Carriage bolts have a domed head. You will need to counterbore the clearance hole so the bolt head sits flat. This will require a paddle bit as large as the width of the head.
- Remember that the nuts should be the same size and finish as the bolt! Do not mix electroplated zinc with galvanized zinc; their sizes are not compatible.
- Carriage bolts are typically available in zinc- and hot-dipped galvanized (HDG) finish. HDG is required for trailers.
- Fair warning: Bolts can be difficult to install with structural C-channel crossmembers. C-channel doesn’t have a flat surface; you’ll have to use beveled washers, which can be very expensive.
FAQ: Can I Use Other Types of Bolts to Attach a Trailer Floor?
- Elevator bolts are similar to carriage bolts, but the head is flat rather than domed. They are quite a bit more pricey and usually only available in zinc plating, making them unsuitable for pressure-treated wood. Almost, elevator bolts are generally available only in Grade 2 strength.
- Carriage bolts can also be installed so that the bolt doesn’t go through the steel frame. Instead, the bolt is adjacent to the frame. Large fender and/or disc spring washers are used to sandwich the parts together. However, this method is only recommended for light-duty trailers.
- Hex bolts are not recommended as the head protrudes above the floor surface, and counterboring that deep unnecessarily weakens the floor.
- Machine screws are rarely used, and are mostly seen when installing expanded metal sheet for a flush installation.
Leave a Reply