Q: What’s the difference between a shiny, white, clean toilet, or a dirty, smelly toilet with sewage bubbling up in the bowl? (Eww …)
A: Working tank sensors!
These humble servants of your plumbing system measure the amount of liquid in your fresh water, gray water, and black water tanks.
- When working, they stay out of sight and out of mind.
- When they don’t work, they’re all you can think about!
How Does an RV Tank Sensor Work?
If the word “sensor” makes you think of NASA robots and Wall-E, fear not! RVs use one of the simplest sensor systems known to man.
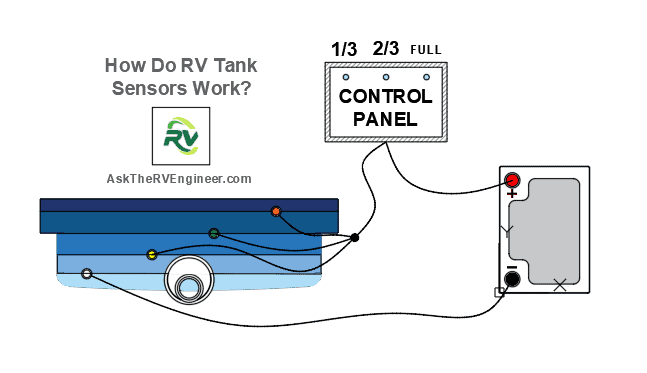
It begins with the tanks. Probes are inserted through the sidewall of the tank. These probes detect the amount of liquid in the tank through an electrical current. Each probe has a different level of resistance, which is detected by a circuit board in a monitor panel.
Psst .. if you’re new to the RV world, I recommend you brush up on some plumbing terms in my RV glossary.
RV manufacturers generally use two types of probes:
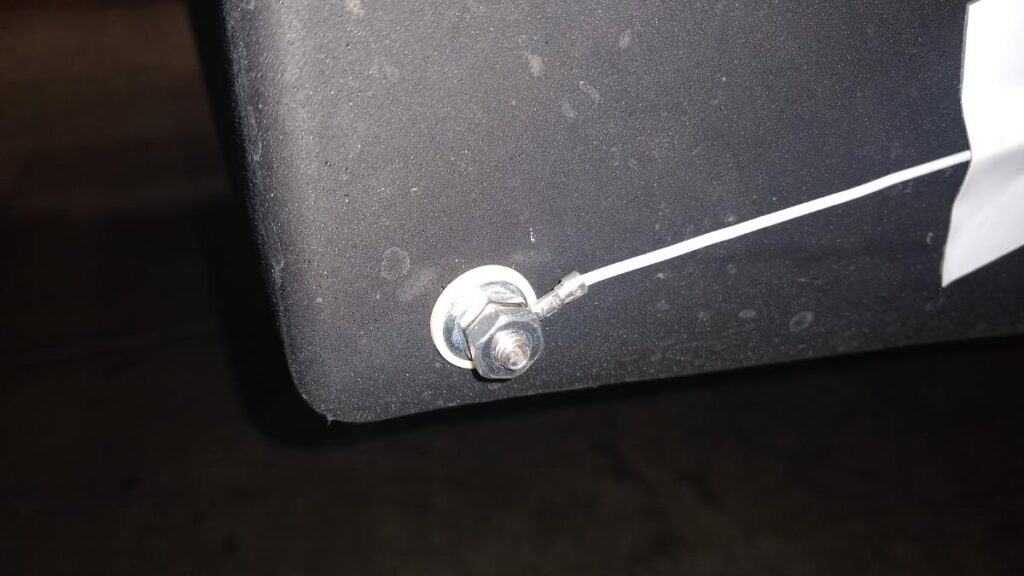
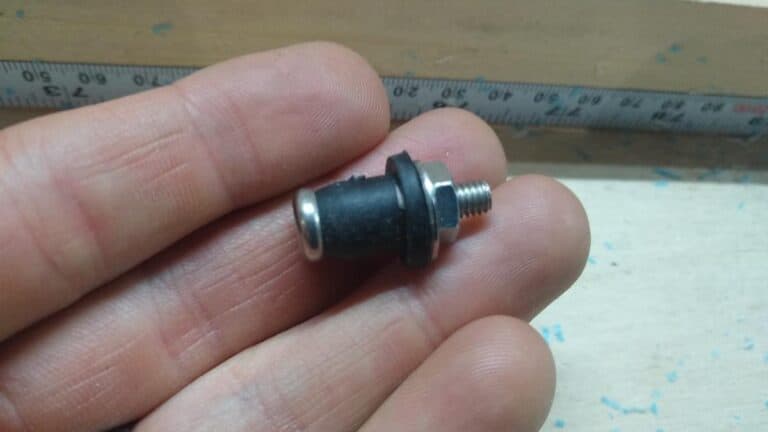
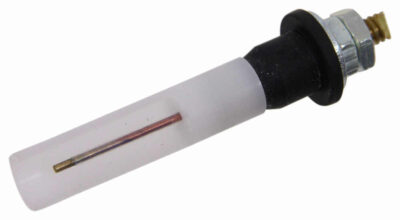
Stud probes
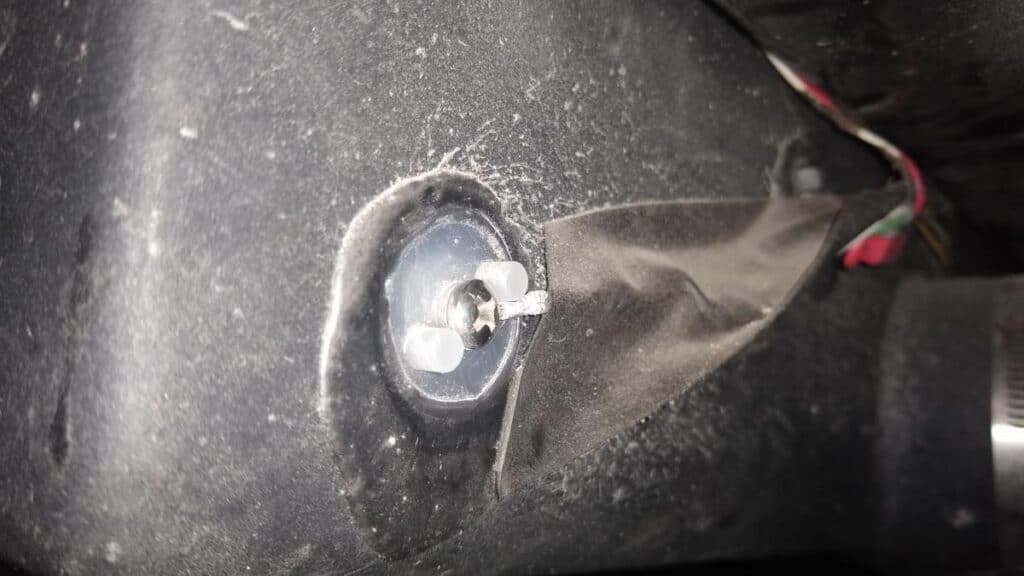
These probes are inserted through 3/8-inch holes. When the first nut is tightened, the rubber housing squishes and seals the hole. The second nut jams against the first, sandwiching the wire terminal.
Screw probes
These machine screw probes are screwed into tapped fittings, which are usually spin-welded into the tank sidewall. To be honest, the basic probes are little more than stainless steel screws with extra bits of hardware to hold them in place.
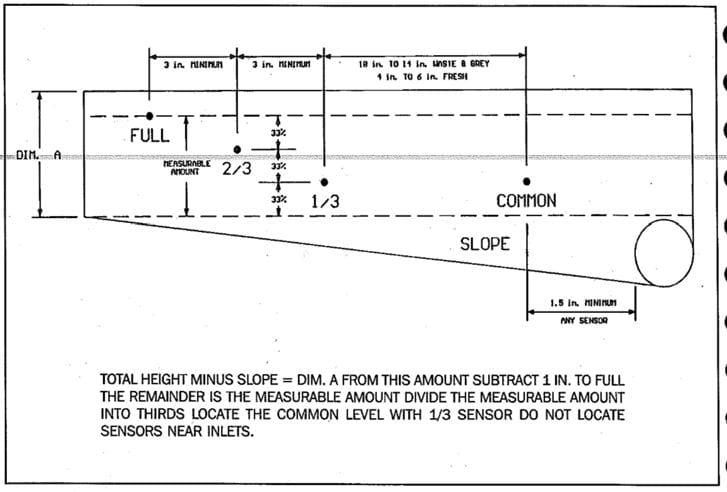
RV tank-level probes are usually installed in thirds or fourths increments.
- Thirds: ⅓ full, ⅔ full, full
- Fourths: ¼ full, ½ full, ¾ full, full
Probes work on a simple principle: electrical conductivity.
- The lowest probe in a tank is the ground, or negative.
- The rest of the probes are leads, or positive.
- When the tanks fill to the level of the probe, electricity flows between the upper probe and the lower probe.
- Each probe has a different level of resistance to electrical current flow, measured in Ohms. Typical values might be 0, 68k, and 188k Ohms for Full, 2/3, and 1/3, respectively.
Wires return from your RV tank sensors to your interior control panel with built-in circuit board. Your LCD screen or LED lights will indicate the approximate liquid level in your tank.
(That’s the theory, anyway.)
Why Are My RV Tank Sensors Not Working?
An RV manufacturer pays about $3 in parts for this setup. And unfortunately, you get what you pay for.
For one, it’s not very accurate. Your control panel will tell you the tank is at ⅓ full whether it’s at exactly ⅓ or ⅝.
For another, if you’re parked on a severe slope, your readings may be completely wrong! RV tank sensor probes can return either a false positive or a false negative.
False Positive Tank Sensor Reading
The tank thinks it’s full when it’s not. This typically occurs when enough sludge builds up in the tank to conduct current down the sidewall interior, even if the tank is empty. It can also be caused by a short-circuit somewhere in the wire harness.
False Negative Sensor Reading
The tank thinks it’s empty when it’s not. This occurs when enough grime or grease covers a probe that it shuts off conductivity completely.
A false positive is the more common problem.
Common Causes of RV Tank Sensor Failure
Corrosion
No common metal can survive the contents of your black water unscathed. Over time, even stainless steel probes can rust or corrode. If they corrode completely, you will get a false negative, and no current will be able to flow.
Sludge
I’ll let you imagine what “sludge” could be. Anyway, sludge and gunk can cover your probes, either causing a false positive or a false negative. A false positive is more common, since the wet, squelchy sludge can actually be electrically conductive, allowing current to bypass the tank’s liquid contents and go straight to ground.
Deposits
“Hard” water carries minerals, like struvite, that can consolidate on the sensor points. These can inhibit electrical conductivity and either cause a false negative or an inaccurate reading, since the resistance of the connection will be out-of-spec.
Leaks
Both stud and screw probes can leak over time. This is annoying with a freshwater tank but could be a MAJOR problem with gray or black water tanks!
Advanced RV Tank Sensors
If your tank sensors don’t work and refuse to be cleaned, you have three basic options.
- Stick with industry-standard probes. Have your tanks professionally cleaned, and cross your fingers they’ll last a few more years.
- Upgrade to aftermarket protected probes and sigh contentedly.
- Replace them with advanced digital sensing technology.
Option 4: Ignore them completely. Empty the gray water tank when it backflows into the shower. Empty the black waste tank when you can see the dreaded “mound.” Sadly, this is what many RVers resort to! But life doesn’t have to be this way!
What’s the difference between Options 2 and 3? Read below.
No. 2 – Miracle Probes
If regular probes were Neanderthals, miracle probes would be 21st century New York City cosmopolitans. Think of them as super-advanced versions of a regular probe.
- They are longer and less likely to be covered by gunk and slime.
- They have more conductive points for better conductivity and less risk of corrosion.
- They are coated in Teflon or other non-stick coatings.
- Black tank versions usually have a guard or shield to prevent toilet paper snags.
Yes, they work. They are excellent little versions and, IMHO, will one day become OEM standard.
FYI, if you need to secure wires to the sidewall of your tank, EternaBond works pretty well.
No. 3 – Digital Sensors
A digital sensor is an adhesive-backed microprocessor-controlled electronic circuit board strip – wait, it gets simpler! – pasted to the side of your tank.
If you don’t understand how radio frequency signals work, that’s fine. Basically, you paste these magic strips of tape to the outside sidewall of your tank, and they tell you what’s happening inside. It’s like X-ray vision. Pretty cool, huh?
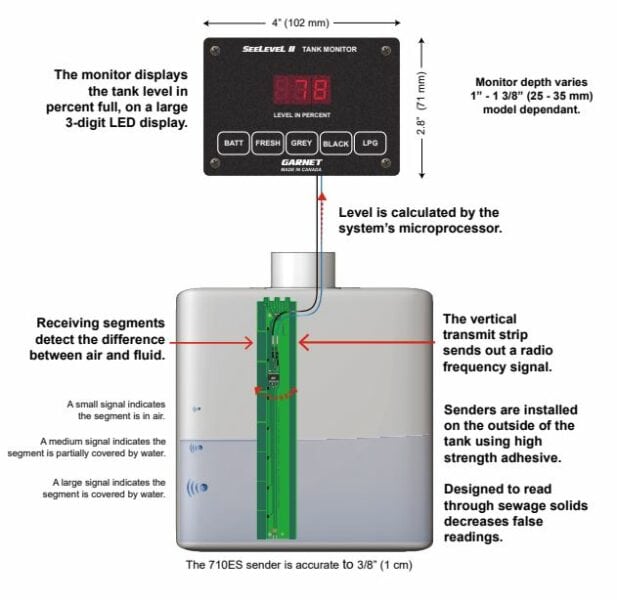
Properly installing these strips, called senders, isn’t hard, but you have to do it right. Garnet Instruments is the market leader for aftermarket RV tank level sensors. They produce the SeeLevel sensor system. Some finer points include:
- The sender has to be positioned ¼ inch to ¾ inches away from the top and bottom of the tank.
- The senders may not work on excessively thick tanks (⅜ inches or greater)
- The more sludge inside the tank, the less accurate the sender.
So long as everything works, however, these systems are marvelous. They are compatible with tanks from 4-½ to 34 inches tall; for fresh, gray and black water systems; for any size or style of RV. They are accurate to within ⅜-inch of liquid level!
How to Clean RV Tank Sensors Probes
Unfortunately, no matter what type of sensor you use, an excessively dirty tank can foul any of them. You must keep your tanks clean!
Grease can build up in gray water tanks. Fecal matter and toilet paper residue can build up in waste tanks.
Gray Water Tank Cleaning Instructions
Cleaning a gray water tank is an easier enterprise. Usually, the cleaning routine involves some version of filling up your tank to ⅓ level, adding copious amounts of dish soap or holding tank cleaner, driving around the block to mimic a dishwasher effect, letting it sit for the night, driving the other way ‘round the block, and then draining the tank.
If this sounds like a lot of work – well, it is. Prevention is worth a lb of cure. If you flush your gray tank with soapy water every time you dump it, you’ll avoid most buildup problems. A clear sewer elbow goes a long way to confirming a clean tank!
Black Water Tank Cleaning Instructions
Cleansing a black tank is … not always so easy. There are a dozen suggested routines to purge a waste tank, most of which are beyond the scope of this article. Like the gray water tank, they all involve copious amounts of water, cleaner, and agitation.
If you have a black tank rinse, you’re in luck! If not, you might have to use an old-fashioned “wand,” which inserts into the tank through your toilet and sprays high-pressure water in a circular pattern.
Some RVers swear by ice cubes. Drop some crushed ice cubes into the tank, they say, drive to the gas station and back and hit every pothole on the way, and the crushed ice helps break up hard solids and sludge in the tank.
Again, using lots of water when flushing and periodically rinsing the black water tank will alleviate most of the severe buildup. For more information, check out this cleaning article from Etrailer.com.
Breakdown of organic matter in a black water tank is largely based on the ventilation through the venting system. If your RV doesn’t vent your black tank very well, you might need to add enzymatic cleaner, such as Unique, to your tank to speed up the decomposition.
Unfortunately, none of these solutions can deep-clean a tank. They can’t scour struvite or calcium deposits. If your tank has never been professionally cleaned, then you need to call for help!
Or Let Someone Else Do It
If all this tank-cleaning business sounds gross, you can have an RV technician or RV dealership power-clean your tanks through the waste valve. I
In fact, here’s a video of that in action:
Conclusion – Let Technology Work For You!
Here’s my advice:
Every time you dump your tanks, rinse ‘em with soap and water. Always add 3-5 gallons before using your blank tank. Flush as little toilet paper as possible (and avoid anything beyond single-ply). Use enzyme-based tank cleaners to break down organic matter …
AND invest in better probes. Miracle probes are a small investment but a major headache-reducer. If you want superior accuracy and peace of mind, choose a digital sensor system. You won’t regret it.
Leave a Reply