If you’re constructing a steel frame trailer, then here’s a hard-to-accept truth: It’s very difficult to replicate a factory-applied finish for your trailer.
Manufacturers have access to tooling and fabrication processes unavailable to the homeowner.
Most factory trailer frames are either sandblasted or dipped in an acid bath to clean and prepare the metal. Then the frames are either powder-coated in a giant industrial oven, e-coated through a dipping process, or primed and painted using a spray-on catalyzed finish.
Unless you’re one of the few home builders with a giant paint booth and high-pressure spray gun in your backyard, you don’t have those two options.
So let’s consider your simplest option for painting a homemade steel trailer.
Before You Begin! – PPE
Paint, degreasers, solvents and other chemicals are nasty, nasty concoctions. Common chemicals include MEK, acetone, xylene, etc. None are safe for the human body, whether through skin contact, eye contact, ingestion, or inhalation. Many are extremely flammable, severely toxic, and pose long-term dangers to the health of your central nervous system.
Even if a product says it’s safe for outdoor use, I recommend you fully protect yourself with chemical-resistant disposable gloves and an approved respirator.
By the way, a dust mask is not a respirator! It’s a dust mask. It does absolutely nothing against isocyanates and VOCs.
Here’s another important truth: A paint topcoat is only as good as its preparation.
How to Paint a Homemade Trailer Frame
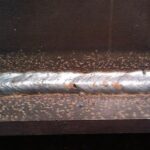
1. Prepare the Welds
It almost goes without saying, but all weld spatter and slag should be removed from the weld. Beads should be ground to their final specification.
Unfortunately, welds are often the worst locations for rust on a trailer frame. The naked steel, rapidly cooled, can flash rust in a matter of hours in a humid environment.
If you plan to wait several weeks or months between welding your frame and painting your frame, be prepared to go the extra mile.
You have three options.
- Apply an oil barrier (non-evaporative) to the weld to prevent rust from forming. When it comes time to prime, you’ll need to remove all oil with an evaporative degreaser/solvent, such as acetone.
- Let the welds rust, and attack them viciously in the future with a wire brush and rust-remover chemical. Curse your lack of forethought. (This solution is not recommended).
- Apply a stripe coat. There are many stripe-coat products on the market. Some are designed to be applied when the weld is still hot; others, when cool.
All other things being equal, a stripe coat is the best solution.
If you plan to prime your trailer frame within a few hours or days of welding, the welds may not require any special rust-preventative treatment.
2. Remove Dirt, Scale, and Contaminants.
Cleaning Cold-Rolled Steel
When cleaning cold-rolled steel, you are removing the machine oil applied by the mill. There is no need to grind away the surface of the steel itself.
Cleaning Hot-Rolled Steel
If you’re using hot-rolled angle or plate steel, then the metal will have an ugly, scaly, mottled surface rather than a bright, oily, grainy surface.
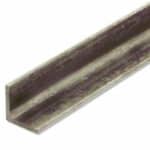
This iron oxide scale is called mill scale, and it’s the result of cooling hot steel in the atmosphere. Unfortunately, it’s very difficult to remove.
Some online sources will tell you that you can remove mill scale by, say:
- Attaching a bristle wire wheel to a hand drill.
- Sanding the steel with 60-grit sandpaper and an oscillating palm sander.
- Rinsing the hot-rolled steel with phosphoric acid.
All this advice is only effective for loose mill scale. You will not be able to remove hard mill scale using such methods.
If you want to remove ALL the mill scale from hot-rolled steel, then your only practical option at home is to grind: Attach a flapper sanding pad or a knotted wire wheel to an angle grinder and get to work for several tedious soul-sucking hours.
Or just ignore the mill scale completely. Truth be told, 90% of the time, removing mill scale isn’t worth the trouble. Just knock off any loose scale with a stiff-bristle wire brush and leave the rest.
If you require a smooth finish for cosmetic reasons, I recommend you start off with cold-rolled steel in the first place. It costs more, but you’ll save yourself many hours of fruitless effort.
Or hire a professional to do the work for you. Call your local metal shop or industrial painter and ask about their sandblasting or shot blasting services. You’ll pay a few hundred dollars, but you’ll get the best metal preparation your money will buy.
3. Etch & Prime the Bare Steel
If you’re applying a regular primer to the steel, you’ll need to clean and etch the bare steel first. This is a labor-intensive job. It involves a lot of microfiber cloth, wash rags, and nitrile gloves.
Before washing the steel frame, you’ll want to blast the frame with compressed air to remove bulk debris and contaminants.
Next, you’ll need to acid wash the frame. Manufacturers use multiple-stage acid washes, but as a homebuilder, you’re limited to the more mild acids sold on home improvement store shelves. A popular choice is Klean-Strip phosphoric acid.
After etching the bare steel, you need to follow through with a primer relatively quickly. A night or two in a damp garage can cause flash rusting, especially in humid weather.
Red oxide primer has remained the gold standard for a simple, affordable, effective metal primer for many years.
Some primers are “self-etching.” They include an acid and zinc in the chemical stew, so they can both etch and bond to the underlying metal.
4. Apply a Topcoat Paint
The topcoat paint of your frame is very important! It should have the following characteristics:
- UV-resistant
- Glossy
- Waterproof
- Chemical-resistant
- Corrosion-proof
Do not use automotive clear coats, residential house paints, deck and siding topcoats, or decorative paints on your trailer.
While you may be tempted to investigate the use of OEM solutions like epoxy siloxanes, 2-part urethanes, baked powder coats, and other hardwearing finishes, these are not practical solutions for most home builders.
A simple tractor/farm implement paint or high-performance metal enamel, properly applied, will last many years. And it will be easy and affordable to touch up.
Tractor paint is normally brushed or rolled, while general-purpose metal enamels can be brushed, rolled or sprayed. You’ll find extra-large aerosol cans of metal enamel at your local home improvement store or farm equipment supply. Aerosol cans can be more convenient than a roller or brush, but the paint costs more, and you’ll need 3-4 coats rather than just 1-2.
Popular topcoat brands include:
- Rustoleum
- Krylon
- POR-15
If you’re refinishing an aluminum trailer, Total Boat aluminum paint is another recommended choice.
Properly spraying a finish is beyond the scope of this article. Most homeowners do not have access to a spray booth or would rather not pay to rent one. Plus, there is the cost and technical skill required to set up an HVLP spray gun or similar system. The hassle is simply not worth the benefits for most homeowners.
NOT RECOMMENDED
Bedliner
At first glance, coating a trailer frame with a tough-as-nails bedliner sounds like a good idea. “If it’s good enough for a truck bed,” you say, “it’s good enough for me!”
I would advise you to steer clear of this option.
For one thing, “bedliner” is a term applied to many chemical concoctions, some of which come out of a 1-gallon bucket, some out of an aerosol can, and some out of a $30,000 high-pressure mixing machine.
Topnotch 2-part bedliners like Rhino or Line-X are, yes, tough as nails. But they can only be applied by special machines and trained technicians. You’re building a trailer, not a Panzer. You’ll easily spend as much money on your finish as on the rest of your trailer!
Medium-quality bedliners, such as catalyzed 1-part urethanes, are prone to rock chips and scratches. Plus, popular products such as Durabak or Herculiner don’t adhere well to steel without meticulous surface preparation.
Low-quality “bedliners,” which is essentially anything out of an aerosol can or out of a 1-gallon can that costs less than $100, aren’t worth the money you paid for them in the first place. Most will flake off and cannot be easily recoated.
Again, very few bedliner products can be easily spot-fixed like conventional paint.
Galvanized Steel
Most galvanized frames are first welded, then sandblasted, and then dipped into a giant vat of zinc.
For obvious reasons, this option is not available to the home builder, and very few galvanizing factories will entertain the idea of a one-off job – for the very good reason that if a frame doesn’t have sufficient vent holes, the liquid zinc can explode (think of boiling lava).
With that said, if you can find someone willing to galvanize your frame, take them up on the offer. Be aware that you’ll probably pay in galvanizing what you’ve already paid in all other materials!
***
In my opinion, attempting to replicate a factory finish on a homemade trailer is a nearly fruitless effort. Yes, it can be done, but at great cost and time. If you are determined to replicate a factory-finish, I advise you to call around until you find an industrial company willing to powder-coat or galvanize your frame. Otherwise, clean/prime/paint, and touch it up once a year.
Leave a Reply