No lie: Driving a motorhome can be exhausting.
You plant your hands at 10 and 2. You keep your eyes on the road, ears twitching like a cat’s, eyes darting like a fox’s. No one disturbs the driver; that’s the house rule for driving a motorhome.
If you think piloting a 20,000-lb vehicle on the freeway is bad, just imagine snaking through downtown alleys or National Park switchbacks! Nothing strikes more fear in the heart of a motorhome driver than the sign, “Hairpin Turn Ahead – 5 mph.”
The truth is, Class A and Class C motorhomes make better base camps than exploratory vehicles. They just aren’t much good as daily drivers. Just imagine parking up your 36-ft motorhome every time you needed bread from the supermarket! Or paying $4.20 at the pump for a vehicle that gets 8 mpg (on a good day).
…. which is why many RVers choose to tow a vehicle behind their motorhomes. Affectionately called dinghies or toads, these tow vehicles can be detached for local adventures. You can leave your motorhome at the campsite, slide-outs and awnings deployed, and take a jaunt in your Jeep instead!
Let’s learn a little more about towing a dingy behind your RV. Specifically, we’ll be learning about flat towing: towing a car that’s rolling on all four wheels!
This post is an introductory guide to how to flat-tow a vehicle behind your RV. It doesn’t cover every aspect of the process (that would take 30,000 words and a publishing contract).
Once you’ve sorted everything out, flat towing (also called dinghy towing or four-wheels-down towing) is incredibly easy. But getting the right vehicle, the right tow bar, the right braking system – it may try your patience. You’ll read more instruction manuals than you ever dreamed of. You’ll need to cough up a few thousand dollars.
So don’t bite off more than you can chew. This is really a situation where your dealer can be a huge help. Ask them for their recommendations. They’ll winnow down the field of options.
I am also not the world’s foremost expert on dinghy towing. You can read some great information at these resources:
- Dinghy Towing, by Motorhome
- 2020 Guide to Dinghy Towing, by Good Sam
- Basics of Flat Towing, by FMCA
- Guide to Flat Towing Setup, by Etrailer.com
3 Options for Towing a Vehicle Behind Your RV
Here’s a little background on towing. There are three ways to tow a toad vehicle behind an RV:
- Car Hauler
- Dolly Towing
- Flat Towing
Car Hauler
This is the red carpet treatment for your vehicle. You strap down your vehicle to a car hauler trailer, and away you go!
- ADVANTAGE: This method puts the least amount of wear and tear on your tow vehicle.
- DISADVANTAGE: This method … doesn’t work in reality. Towing a separate vehicle on a car hauler is just too … too awkward. It kills your fuel efficiency, for one thing. And where are you going to park your giant car hauler at your campsite? Can your RV even handle the combined weight of a trailer plus vehicle? Almost certainly not!
Dolly Towing
Dolly towing is perhaps the most common method. Almost any front-wheel-drive vehicle can be towed with a dolly, with the front wheels lifted on the dolly, and the rear wheels rollin’ along.
- ADVANTAGE: Dolly towing is versatile. And the equipment isn’t inordinately expensive.
- DISADVANTAGE: You’re still stuck with a cumbersome hunk of mechanical equipment to squirrel away at your campsite. And tow dollies have weight limits – you probably won’t be able to haul your F-150 King Ranch on a dolly!
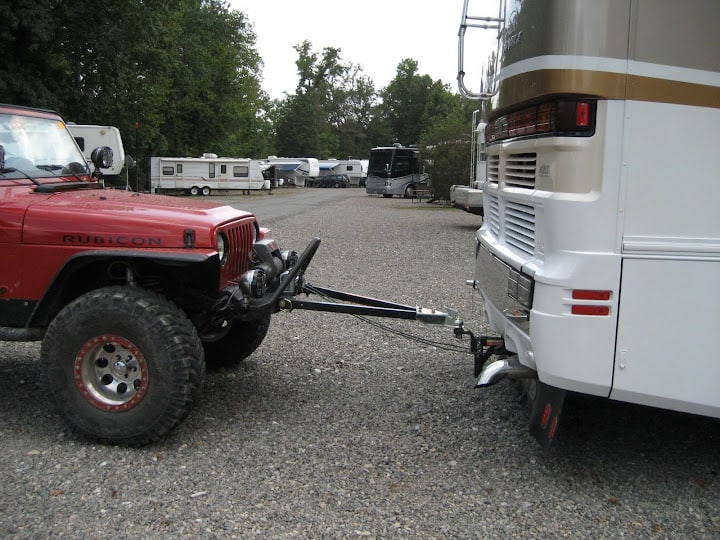
Flat Towing
Also known as 4-wheel towing or 4 wheels down, flat towing is the simplest towing solution: Just hook up your vehicle to a tow bar, and away you go!
- ADVANTAGE: Flat towing is super fast and convenient. There’s no finagling with a trailer or dolly – just unhitch and drive away! Plus, with less weight to tow, there’s less impact on your RV’s fuel economy and Cargo Carrying Capacity (CCC).
- DISADVANTAGE: Flat towing has two big disadvantages, which we’ll discuss later in this guide. For one, most cars can’t be flat-towed. (It’s the curse of automatic transmissions). And secondly, flat towing can put a lot of wear and tear on your vehicle’s drivetrain, such as transmission, wheel bearings, and tires.
For the rest of this post, I’ll focus exclusively on flat towing.
Flat Towing – What Is It Good For?
Better MPG
1 Motorhomes suck gasoline like teenage boys eat pizza. Of the three towing options, flat towing has the least impact on your motorhome’s fuel efficiency. The tow vehicle travels in the slipstream of your coach, and in some cases, can actually improve fuel economy by reducing the vortex effect! Plus, you’re not adding on the 500-2,000 lbs of a tow dolly or car hauler.
Least Expen$ive
2 So long as your vehicle can be towed without modification, flat towing is the least expensive option. There’s no cost of associated equipment beyond the base plate, tow bar, lighting harness, and brake setup.
Less Maintenance
3 Towing a toad with a dolly or car hauler means towing another piece of mechanical equipment. That means servicing trailer brakes, connecting lights and safety cables, etc. It’s a hassle. With flat towing, you have no maintenance beyond your tow vehicle itself.
Freedom & Mobility
4 Where exactly do you plan on storing a tow dolly or car hauler once you arrive at your campsite? Depending on the campsite, dollies may not be allowed, or could be charged extra! Plus, moving a tow dolly generally requires two people. They’re heavy. In contrast, disconnecting a toad is super-easy!
Larger Capacity
5 You’re limited by your GCVWR. Because you’re only towing the weight of a vehicle, not any equipment, you can tow a heavier vehicle! If you want to tow a pickup truck, such as an F-150, then flat towing is the way to go.
What You’ll Need for Dinghy Towing
So you want to tow your toad behind your RV? Here’s what you need!
- Baseplate
- Tow bar
- Lighting
- Braking
- Compatible vehicle
We’ll discuss each of these in some detail.
1. Baseplate
Most trailers have an “A-frame” tongue to attach the trailer body to the tow vehicle. Passenger vehicles don’t. So think of a baseplate as like an A-frame tongue for your dinghy.
A baseplate is a structural steel bracket custom-designed for your vehicle. It attaches to your dinghy vehicle frame, enabling it to be safely towed.
Most baseplates are secured to the front of the vehicle. A few are installed underneath. If you didn’t know what you were looking for, most of us would completely miss it. Once installation is finished, most base plates fit right in!
Baseplates are custom to each vehicle model. Unless you’re an accomplished grease-monkey mechanic, leave the installation to the experts. It’s not easy. You can search the website of Blue Ox, Demco, and Roadmaster for make-model-year fit tables.
Most companies make adapter plates so you can use Company A’s tow bar with Company B’s base plate.
If am OEM does not supply a base plate for your vehicle, you may be able to order a custom plate. Be warned, though, that this modification can get expensive!
2. Tow Bar
Choosing a tow bar … is a deep rabbit hole. There are so many options! Tow bars started out in the 1970s as simple steel A-frames. Today, they are miracles of engineering – and quite foreboding the first time you go shopping!
Dissecting the ins and outs of a tow bar would fill up its own article. Here are the basic distinguishing features:
- Shank size: Available for, 2-½”, or 3” hitch receivers
- Leveling: Some tow bars offer drop/rise configurations for level toad towing.
- Weight: Tow bars made with partial aluminum components weigh less, as little as 30 lbs!
- Capacity: Common load ratings are 3,500 lbs, 5000 lbs (most popular), and up to 10,000 lbs!
- Lighting: Most tow bars will include a coiled wiring harness for lighting. If not, you’ll need to purchase a harness separately.
- Safety cables: Again, many tow bars include safety cables or chains. If not, you’ll need to source your own.
- Non-binding: Most “best of” RV tow bars feature non-binding arms that can move independently of each other. Highly recommended! Classic fixed arms are known as “knuckle-skinners” for a reason. They can be virtually impossible to disconnect on uneven ground.
- Mounting: Some tow bars are permanently mounted (foldable) to the motorhome. Others must be removed and stored when not in use.
Choosing a tow bar is much like choosing a weight-distribution hitch: There are a lot of good solutions on the market. One isn’t “the best” for everybody. Chat with other RVers (hopefully with similar rigs and dinghies) to get their opinions.
Popular manufacturers include Remco, Blue Ox, Roadmaster, Demco, Curt, and Reese.
3. Lighting Harness
You need braking, running and turn signal lights on your dinghy, same as if you were towing a trailer. Most tow bars will include a coiled wiring harness for lighting. If not, you’ll need to purchase a harness separately.
Unfortunately, running the lights on a tow vehicle is more complicated than just plugging in a trailer umbilical cord.
Universal Splice-In Harness
A If you’re comfortable with taping, splicing, crimping, fusing, fishing, routing, drilling, looming and heat-shrinking, then you’ll feel right at home with a splice-in harness!
These are cheap, but they take a few hours to install. If you don’t know how electricity works, don’t try installing one yourself. You can seriously damage your car (or yourself) messing around with electricity.
Plus, some vehicles require fuses to be removed before towing … some require disconnecting the negative battery cable … etc.
Vehicle-Specific Harness
B If your vehicle was designed for four-wheel-down towing, then you’re probably in luck! Someone out there – Hopkins, Curt – probably makes a plug n’ play harness for your vehicle!
These harnesses don’t require any splicing. They just plug into multi-pin connectors on your vehicle. Plug, play, and drive away!
These are specific to make, model, year and trim.
Bulb n’ Socket Harness
C Bulb n’ socket systems simply bypass your vehicle’s wiring completely. You install a separate LED taillamp inside your vehicle’s taillight housings (not all vehicles have room for extra bulb, FYI). You route the wires through (or below) your vehicle to the connector at the tow bar. These kits are simple in theory, but take some time to install.
Temporary Lights
D If all this talk of splicing and connecting scares the bejeezus out of you, you can purchase an auxiliary lighting bar. These lighting bars attach temporarily to your toad vehicle, either with magnets, suction cups, or bolts. Some are even wireless, and no wire routing is necessary!
4. Braking Buddy
Fun fact: Usually, vehicle brakes are only designed for the GVWR of the vehicle itself! So your motorhome’s brakes weren’t designed to tow a 5,000-lb car. You need auxiliary brakes to keep yourself safe.
If you tow without an auxiliary braking system, you could be endangering yourself and other drivers. It’ll take much longer to come to a stop. And in most states, auxiliary braking systems are legal requirements for trailers or dinghy vehicles exceeding 3,000 lbs.
You have two options for a braking system:
- Portable
- Hardwired. This takes – you guessed it – more wiring!
Neither are, shall we say, cheap. Figure at least $1,200. Most sit on your floor between your accelerator pedal and driver’s seat and basically act as a human foot. Some can be plugged into a 12V cigarette lighter outlet; some need to be spliced into the system.
Similar to other brake controllers, you can get a model with proportional or time-delay braking.
5. Dinghy Vehicle
We haven’t even talked about what vehicles are compatible with flat towing!
And … I’m not going to. Because the fine folks at Motorhome.com have done it for us. Click over to Motorhome for a full list of vehicles that can be towed four-wheels-down, plus notes on special procedures.
Discussing the ins and outs of a particular vehicle for flat towing is worth another article (or two). Suffice it to say, some cars are easier than others. Many cars can be flat-towed for short distances, but towing them across the country would cause too much wear and tear.
Some vehicles can be modified for four-wheels-down towing with driveshaft disconnects and lubrication pumps and other machinery gimmicks. As you can imagine, this becomes expensive.
Same vehicles, like the Jeep Wrangler, couldn’t be easier to flat tow. Others, like the GMC Sierra … well, take a look at Motorhome’s special notes:
Only flat tow 4WD vehicles that Denali 1500 4WD have a Neutral and a 4WD Low setting. Apply parking brake and start engine. Shift transfer case to Neutral. Check that vehicle is in N by shifting transmission to Reverse and then to Drive. Shift transmission into D. Turn engine off. Shift into Park. Wait at least 10 seconds, then restart engine. Shift transmission to D, then turn engine off again. Disconnect negative battery cable at the battery and secure nut and bolt. Cover negative battery post with nonconductive material to prevent contact with negative battery terminal. Shift transmission to P. Move steering wheel to make sure steering column is unlocked. With foot on the brake pedal, release parking brake. Keep ignition key in the vehicle in ACC to prevent steering column from locking. See owner’s manual.
Motorhome Magazine
Yuck.
So remember, just because you see someone pulling a car down the road doesn’t mean it’s the right car for you! They may be a Snowbird, relocating 2x a year for 400 miles. They don’t mind running the toad engine five minutes at every fuel stop to lubricate the transmission. But you might.
I know. It sounds like a lot of work. And – well, it is. Setting up a vehicle for flat towing requires some research (and not an insignificant amount of cash).
But the work is worth it. Flat towing a dingy vehicle gives you unparalleled flexibility. You can chill out at a campground, explore a switchback mountain pass, or drive to the local woodfired joint – all on the same day, if you want!
Leave a Reply