This article is not a step-by-step instructable on how to replace your RV floor. That’s because there are a hundred of those instructables online and in popular forums like FiberglassRV.com and iRV2.com. Also on YouTube. May I recommend this one from Brian at RVwithTito.com?
But if you’re struggling with a damaged RV subfloor, then I recommend you START here. You won’t finish here (you’ll wind up on one of those 42-point DIY instructables), but this article will get you aboard the right flight. Because here’s a dirty secret:
RV manufacturers generally consider a damaged subfloor a totaled camper.
As a rule, RV subfloors are not designed to be replaced. Most of the time, the sidewalls are placed directly on top of the subfloor. You can’t remove a subfloor without tearing down the entire RV. So if you want to fix yours, you’ll have to get creative.
Where Are RV Floor Leak Locations?
Yes, this article is about floors, but let’s start by talking about leaks. Because a leak is what caused your rotten floor. And if you don’t fix it, you’re just wasting your time.
Where are common leak origins?
Slide-Out Rooms
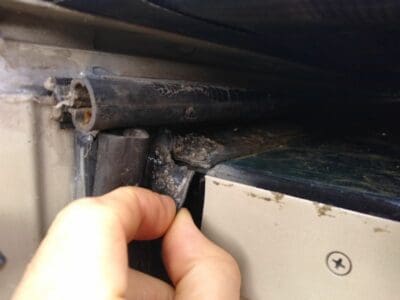
Slide-outs are basically magnets for every RV problem. A faulty seal can easily channel water into or atop a subfloor. Common culprits are torn overlaps between the top and side wiper seals, like this:
Door Thresholds
Door thresholds are classic hotspots for water leaks. Wind-driven rain soaks the edges of the subfloor where it butts against the aluminum door threshold.
Wheel Wells
Water and grime thrown up by spinning tires can find its way around plastic wheel wells, leaching into the untreated edges of the routed subfloor.
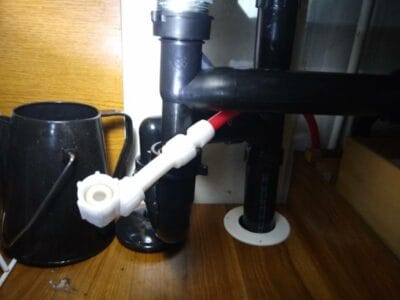
DWV Pipe Penetrations
Common culprits for water leaks are water pipes, especially 1-½” gray water and 3” black water drain pipes. These leaks can be particularly insidious, since the water may contain effluent and other bacteria.
Body Corners
All corners of the RV are fair game for leaks. Check the two front corners behind the fiberglass cap, and check the two back corners of the rear wall.
Why Is My RV Floor Soft or Spongy?
Uh oh! Is that … a puddle? … why is my RV floor WET?!
Looking for something to blame? Here are three mug shots:
Criminal 1: Condensation

When warm, humid air is cooled, water condenses on surfaces. After all, that’s why dew forms on morning grass.
And when water condenses atop a subfloor, the subfloor may absorb that moisture. And when the air warms back up, the moisture evaporates.
This repeated wetting and drying cycle can actually be worse than total immersion in water. It causes severe rot and disintegration.
Condensation is a problem with RVs that are poorly insulated or stored outside with the windows and vents closed.
It may also be a problem seen with single-pane windows. Condensation forms inside the windows on cold mornings, drips down the wall, and seeps into the subfloor.
Note that condensation is NOT caused by a water leak! It has two causes: the movement of moisture air in and out of a camper, and the differences in daily temperatures.
Condensation can be eliminated or reduced with dual-pane windows, window covers, indoor storage, and properly venting your RV during storage.
Criminal 2: Roof Leak
Ah, the dreaded RV roof leak! Difficult to properly seal — and even more difficult to track down. RV roof leaks can wreak havoc with your camper.
Due to the design of most RV roofs, where water exits into the camper may not be within 10 feet of the entry! So frustrating! If you find a roof leak, do three things:
1. Try to visually identify the source by looking for watermarks. Pour a bucket of water on the roof and watch where it goes, looking for any low-spot puddles or dirty drips.
2. No luck? Recaulk your exterior trim and components if the caulking is more than 90 days old.
3. Still leaking? You might need to remove and reseal all your corner trim. I highly recommend a corner seal tape like EternaBond!
4. Still no luck? Then you might need a permanent fix: A seamless roofing waterproofing barrier like RV Armor, or a brand-new roof.
Criminal 3: Your Pets

Sorry to be the bearer of bad news, but no pet is ever 100% potty-trained. Many RV owners have wondered why their floor smelled of ammonia, only to rip up a corner of the flooring and discover a urine-soaked subfloor stained red and yellow.
Check the corners of your RV periodically for secret pee corners. And don’t lock up your pets for hours on end.
Criminal 4: Your Pipes
This might be the worst of the four. Water leaks from busted water pipes and leaky drain pipes can soak a camper from the inside out in a matter of minutes.
As you probably know, frozen water can cause pipes – whether PVC, flexible vinyl, PEX or copper – to bust. A busted pipe can spew 3-5 gallons of water a minute into your camper.
Occasionally, high water pressure can cause leaky pipes, but since RV systems are tested to 80-100 psi, this should be rare – but it’s not. Pressures above 65 psi are considered “unsafe” for most RVs.
Bad quality or cross-threaded fittings can cause leaky pipes. Since most RV manufacturers use plastic fittings rather than brass, an over- or under-torqued fitting can allow water leaks. I’ve even seen fittings arrive from wholesale distributors missing the required O-rings!
Common locations for bad fittings include the water pump connections, the city fill connection, and the outdoor shower box.
Faulty ABS or PVC solvent-weld fittings can cause gray- or blackwater leaks. These leaks tend to be small and slow. They are difficult to diagnose. Sometimes, they aren’t detected until the surrounding subfloor is soaked in sewer water. So gross.
How to Repair a Rotted RV Subfloor?
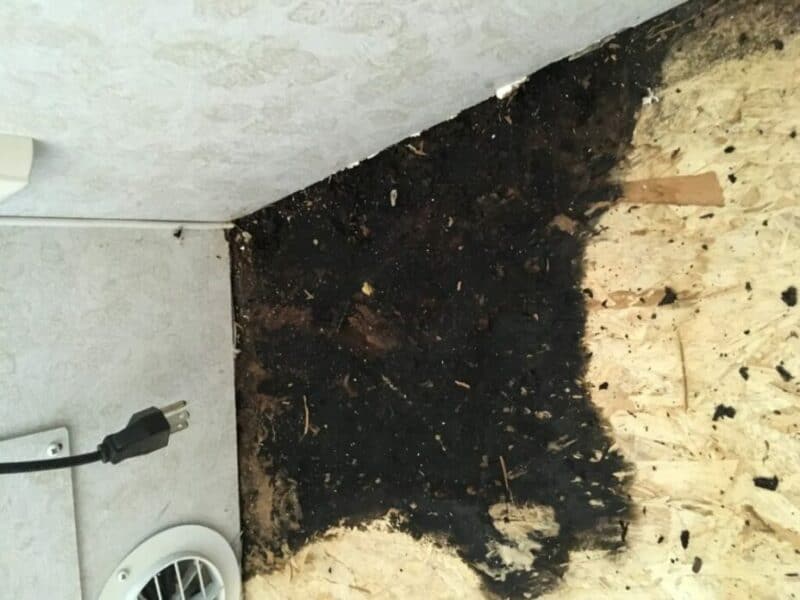
I’ll be honest with you: A soft spot in an RV floor can be a death knell. Short of surgery and a good bit of luck, your floor might be doomed.
By the time a wooden subfloor has become noticeable soft and spongy, it’s in bad shape. This happens because of repeated wetting and drying cycles. Plywood will have suffered delamination, and OSB will have suffered disintegration.
Here’s the bad news: There’s no way to restore a disintegrated wooden RV floor. It’s permanently damaged. The good news is that there are workarounds.
SUPPORT
The easiest workaround is to support the damaged subfloor. For instance, maybe you can screw a ¾” treated plywood backer to the underside of the subfloor. This helps isolate the affected area.
Unfortunately, this hack only works for solid subfloors. And you must have access to the underside, which might mean removing the underbelly covering and anything else in the way.
REPLACE
It some locations, it is possible to remove and replace sections of the subfloor. Depending on your camper design, you may have access from the underside or top (once you remove the flooring materials). If you’re lucky, you can use a jigsaw or router to cut away the rotted area and replace it with a healthy subfloor.
This solution works best for framed floors, although with some luck, it can be done with solid subfloors. It is cheap, but time-consuming. You’ll run into a thousand little things that must be done, like matching trimwork, to ensure a seamless final installation.
PENETRATING EPOXY
This solution is almost too good to be true. Turns out that if you thin epoxy resin with enough solvent, it can soak into rotted plywood or OSB. Once it sets, the epoxy becomes strong and sturdy, just like the original OSB!
These products are called penetrating epoxies. Popular products include:
- Minwax Wood Hardener
- Bondo Rotted Wood Restorer
- TotalBoat Penetrating Epoxy Sealer
These products are rather incredible. They’re like magic! Unfortunately, they’re also quite expensive. And if you’ve never worked with epoxy before, you have a learning curve ahead of you.
And don’t spill it on your floor, or it will never, NEVER come off. EVER.
What About Floor Leveling Compounds?
Many DIYers have used floor leveling and patching compounds, usually latex-based, to “waterproof” sections of rotted subflooring.
I don’t really recommend this. It can work well in some applications, but penetrating epoxies are SO. MUCH. BETTER. In every way.
If you’re going to all the work of repairing rotted wood flooring in your RV, do it the right way, the first time.
Leave a Reply