Let’s learn how to install a 30A outlet (receptacle is the correct word, actually) for an RV at your house.
I should begin this guide with a few words of caution, though. This is strictly a high-level overview of the process. It takes a skilled DIYer or an electrician to do it properly, and there are hundreds of code requirements that must be followed.
- If you can install a 50A receptacle, do it! There’s no harm in going bigger. And the more work the installation requires, the more true this is. If you plan to install a post-mounted RV power pedestal in your backyard, then it would be foolish not to install a 50A receptacle. Going back later to re-trench and re-wire would be more work than just installing a new outlet!
- Codes vary by locality! Yes, most localities have adopted the National Electric Code (NEC). But Authorities Having Jurisdiction (AHJ’s) may add their own restrictions. Ensure you’re following all your local codes and standards.
- If you hire an electrician, confirm they understand a TT-30 RV outlet is wired as single-pole 120V and NOT double-pole split-phase 120/240V! This is a common mistake made by household electricians. It’s a good way to fry your RV.
- Actually, you should hire an electrician. Electricity is dangerous, and when you modify your home, you’re potentially affecting your neighbors and the next homeowners as well.
Why Should I Install a 30A RV Outlet?
With a standard household exterior outlet, you are limited to 20A (sometimes 15A) of power. With 20 amps, you cannot run many RV air conditioners (not without a SoftStart, anyway). And you are limited to a single large appliance at a time. If you try to operate the microwave and the A/C at once, you will likely trip the household circuit breaker.
But with a dedicated 30A RV outlet, you can take advantage of (almost) all your RV has to offer. Some benefits of installing your own RV outlet include:
- Recharge and maintain your RV house batteries
- Operate dehumidifiers and ventilation fans
- Power all RV appliances, including the air conditioner!
- Use the RV as a backyard hideaway!
Can I Plug My 50A RV into a 30A Outlet?
Yes, you absolutely can! I cover this question in more depth in my guide to the surprising difference between 30A and 50A power.
Short story: There’s nothing wrong or inherently dangerous about plugging your motorhome or 5th wheel into a 30A outlet. You just need to use the proper dogbone adapter.
My only word of caution is that the 30A circuit must be protected by a reliable circuit breaker! Because your RV is wired for 50A, it won’t trip a breaker at 35A – but that’s too much power for the 30A feeder circuit! If the receptacle sn’t protected by a working circuit breaker, you could start a fire. So double-check that the receptacle is on a circuit with a working, listed circuit breaker.
What Is 30-Amp RV Service?
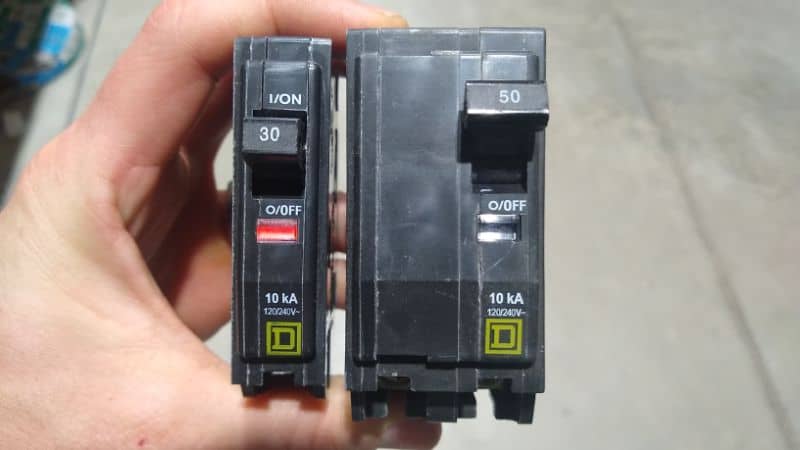
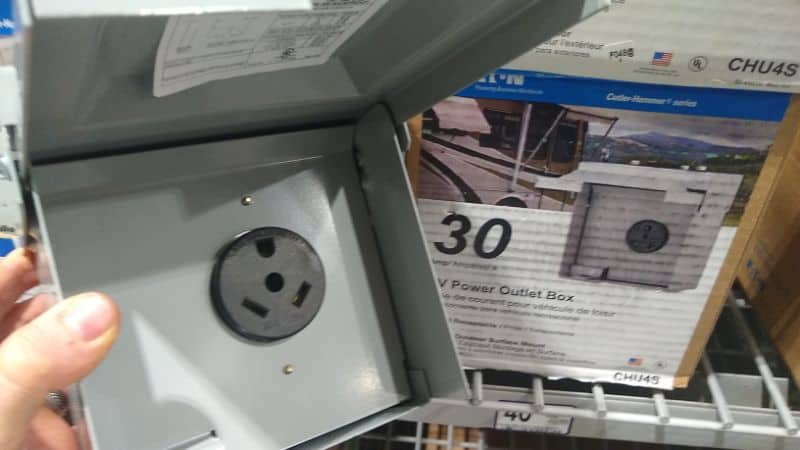
30A RV service is usually a 3-prong receptacle (NEMA TT-30) that offers 30 amps of electricity at 120 volts for a total of 3,600 watts of power. The outlet should be protected by a single-pole 30A breaker in your home’s sub-panel or main breaker box.
To recap: A 30-amp, 120V service provides 3,600W of power (30 amps x 120V = 3,600W)
The TT-30 receptacle is a special 3-prong outlet SPECIFICALLY designed for RVs. It features two angled flat pins and a U-shaped ground.
As I discussed in my FAQ answer about plugging into a 30A dryer outlet, this is NOT the same outlet as the antiquated 3-prong outlet (NEMA 10-30R) used for 240V dryers and washing machines! Don’t confuse the two! You’ll let loose all the magic smoke inside your RV!
What Size of Wire Is Required for 30A RV Outlet?
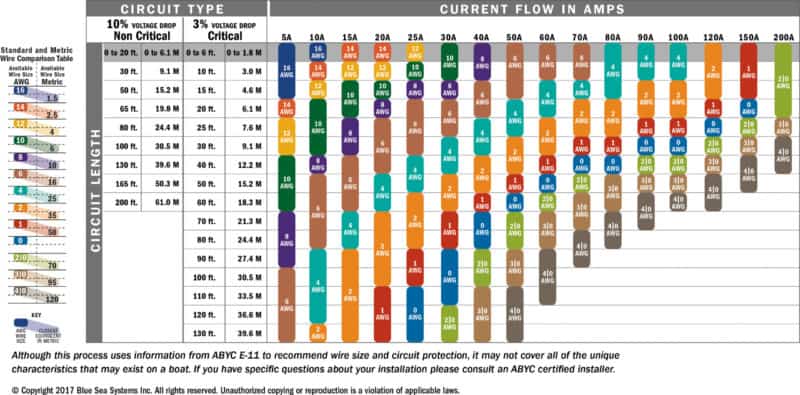
Compared to a household outlet, which is wired with 14-gauge (15A) or 12-gauge (20A) wire, a 30A RV outlet is installed with 10-gauge wire minimum.
Some longer runs may require 8-gauge wire to reduce voltage loss. If the circuit is longer than 75-100 feet from the service panel to your outlet, you should upsize to 8-gauge wire.
If you’ve ever wired a standard household outlet, wiring a 30A RV outlet is very similar. There’s a hot, a neutral, and a ground. Generally, the contacts follow this color code:
- Brass/Black = Hot
- White = Neutral
- Green = Ground
What Type of Wire Should I Use to Install a 30A RV Outlet?
If you are fishing wire through a dry interior space, you can probably use orange 10/2wG Romex cable or black 8/2wG. Romex is an eponym for NM-B cable, consisting of two insulated solid copper conductors plus a ground (EGC) inside a non-metallic jacketing.
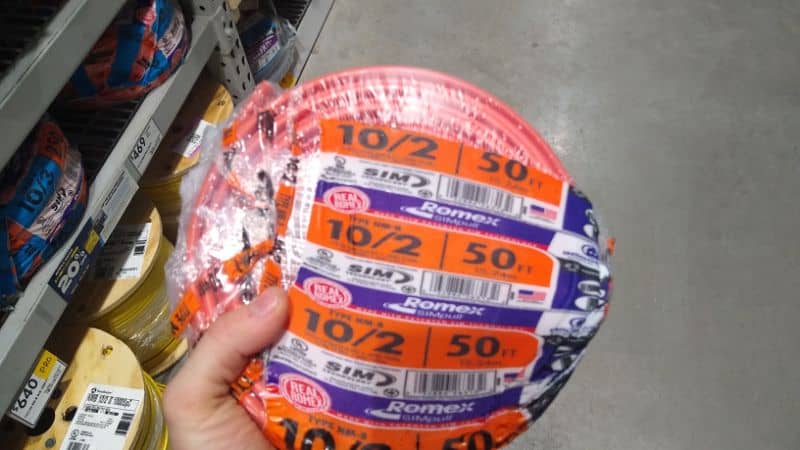
If you are running wire outdoors or underground, you can probably use gray UF-B 10/2wg feeder cable. It looks similar to Romex, but don’t confuse the two! UF-B is rated for direct burial or can be used in wet indoor locations.
An alternative is to use 10-gauge or 8-gauge THWN-2 single-conductor wire everywhere. Fish it through rigid metal electrical conduit where required for outdoor burial applications. While THWN-2 is an extremely versatile wire, it’s not often used for DIY projects, simply because fishing cable is faster. Plus, you’ll need to buy three different colors of THWN-2 wire (black, white, green) in spools or sold-by-the-foot, which can be expensive.
What Type of Outlet Should I Install?
When it comes to installing an RV outlet at home, you have two basic options:
- Install just the outlet receptacle;
- Or install a pedestal box with a built-in circuit breaker
The first option is much cheaper: You just need cable and an outlet! It’s also easier to find places to mount a single outlet.
However, the second option is safer. When directly wired in, a simple outlet is always “on.” When you plug your RV (if also turned on) into an energized outlet, you can cause electrical arcing. But if you turn off the circuit breaker, you can first plug in and then energize. This will increase the lifespan of the contacts.
Can I Use an Extension Cord with My Outlet?
Yes, you absolutely can! If your RV isn’t parked directly next to your outlet, you can use an extension cord along with your standard “shore power” power cord.
However, be aware the longer the extension cord, the more voltage you’ll lose! Low voltage can burn out sensitive electronics and reduce your available power. So keep that extension cord as short and as large as possible.
Also, ensure the extension cord wire is the correct size. Most extension cords are designed only for light, limited loads. Confirm your extension cord uses at least 10-gauge wire, not 12-, 14, and 16-gauge!
Where Should I Install a 30A RV Outlet?
There are three basic options where to install an RV outlet at home:
- Exterior wall of your house
- Shed or detached garage
- Post-mounted pedestal
Each has its pros and cons.
Mounting the box to your home’s exterior wall can be the most complicated. You may need to fish wire through walls. Many times of siding, such as vinyl, brick, stone, and fiber cement, do not readily accept outdoor receptacle boxes (you’re not supposed to fasten through the siding itself). You’ll need to know
Oftentimes, adding an RV receptacle in a garage is the easiest. Power is readily available. Some people even choose to mount the outlet box inside the garage, and simply run the power/extension cord through a window, under the garage door, or through a hatch in the wall. This eliminates the hassle with installing an outdoor outlet.
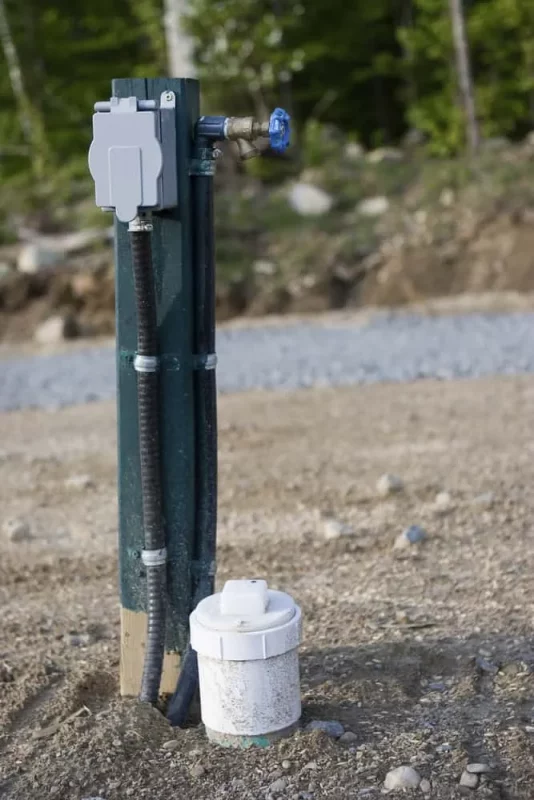
A post-mounted power pedestal is the Rolls Royce of RV outlet installations. It’s by far the most work, since you have to trench a ditch and set a post in a concrete footing. But you can locate the outlet wherever you want!
Do I Need a New Circuit for an RV Outlet?
Should you install a new circuit? Or tap into an existing circuit?
First, a few rules.
- You CANNOT install a 30A outlet by tapping into a 15A or 20A circuit – not even if you protect the RV outlet with its own breaker.
- You CANNOT tap into a 240V circuit! Which means that your 30A circuit for your clothes dryer, welder, or water heater is probably out of the question. 240V service is not safe for your RV!
- You CANNOT tap into a circuit rated for a larger amperage than 30A without installing your own subpanel with a 30A breaker.
Once you understand these three rules … the answer becomes obvious. In most homes, there are simply no suitable 30A, 120V circuits available. You’ll need to install your own.
How to Install a 30A RV Outlet At Home
I’ve listed the basic steps to installing a 30A RV TT-30 outlet at home. Please take electrical safety seriously! While this job isn’t too difficult for the competent DIYer, the stakes are high.
Parts Needed To Install a 30A RV Outlet
- Multimeter/voltage meter
- TT-30 RV receptacle or power pedestal
- Enough NM-B, UF-B, or THWN-2 wire to run your branch circuit. Always order a few extra feet!
- Remember: Use 10-gauge wire for runs of less than 100 feet; use 8-gauge wire for runs longer than 100 feet.
- Optional: 1” rigid electrical conduit (with fittings) if you need to run cable through conduit, such as if you can’t bury your cable at least 24” deep outside.
- Wire staples and/or clamps.
- Wire nuts or lever nuts.
- An empty space in your breaker box for a 30A single-pole circuit breaker
- If you don’t have an empty space in your box, you’ll need to purchase a tandem 30/15 or 30/20 breaker and substitute it for an existing circuit breaker. (A tandem breaker is simply a double circuit breaker that takes up the space of a single circuit breaker on a panelboard.) Don’t confuse a tandem breaker with a double-pole breaker! They are totally different things!
- A single-pole 30A breaker
- Double-check that your circuit breaker type (aka Square D, Homeline) is compatible with your style of breaker box!
You’ll need basic electrical tools like linesman pliers, wire stripper, wire crimper, electrical tape, screwdrivers, etc.
If you plan on installing an outdoor post, you’ll also need a 4×4 pressure-treated 8-ft post, 2-3 bags of quick-setting cement mix, a trencher, shovel, extra large zip ties, and assorted other tools and equipment.
Simple Steps to Installing a 30A RV Outlet at Home
Step 1: Run the Wire
Beginning at your panelboard, fish or pull wire to the location of the power outlet.
This may require trenching in your yard, fishing cable through walls, or installing a pass-thru wall hatch. Unfortunately, this article would be 10x as long if we talked through all the options! Find a qualified tradesman or talk to Grandpa.
Step 2: Mount and Wire the Outlet Box
Mount the outlet box or power pedestal on the wall or post.
If you’re installing the receptacle box on a post, you’ll need to dig a 3-ft x 10-in hole and backfill with quick-setting cement. Let the post cure in its footing before you mount the box.
If you’re installing the box on the outside of your house or garage, you may need to remove siding and use J-channel and aluminum flashing to create a watertight opening. Do not simply screw a mounting box to the wall through vinyl, fiberglass cement, or wooden lap siding! If installing on brick or stone, you’ll need a masonry bit to drill a hole through the siding.
Wire the outlet box in accordance with the manufacturer’s instructions. If wiring a built-in circuit breaker (good for you!), do that as well.
Step 3: Shut Off the Main Power
Locate and open the access panel to the main breaker in your home. This breaker is normally located in your service panel (aka “breaker box”), but in some homes, the main breaker is in its own service panel close to the utility entrance.
Be very careful! The “mains,” the incoming wires from the grid, are ALWAYS LIVE! Shutting off the main breaker does NOT turn off the power from the street. In a proper dead front service panel, you shouldn’t have easy access to the mains lugs, but just so you know! Use a multimeter to check the breakers to ensure there’s no power running through them. Safety first, second and last!
Step 4: Install the 30A Branch Circuit Breaker
Install the 30A branch circuit breaker in its empty space. Or if using a tandem breaker, replace and substitute the breaker of your choice.
Connect the wires to the circuit breaker. Triple-check that everything is in place! Turn the 30A breaker OFF, and then switch on the main power.
Finally, energize the 30A breaker. Use your voltage multimeter (not your RV power cord!) to confirm the receptacle is working properly.
***
Congrats! – you’ve successfully installed your own RV power outlet at home!
Leave a Reply