Every RVer loves to hate the Lippert In-Wall (formerly known as Schwintek) slide-out system. It’s a simple motorized rack-and-pinion drive system that pulls your slide room in and out of your RV, driven by two motors each no bigger than a mouse. And it’s rather infamous for breaking down at the worst possible time.
Why Does Everyone Love to Hate on the Schwintek Slide-Out System?
As a practicing RV technician, I can attest to some of the difficulties. Personally, I don’t think the Schwintek deserves quite all the hate heaped upon its head, but it certainly is a finicky system. The designers have released multiple iterations over the years: inverted vs. standard gear racks; 300:1 standard vs. 500:1 high-torque motors; 6 different controllers; 3 different torque shaft and spur gear designs; Winnebago-only versions; oi vey!
The Golden Rule of working on a Schwintek/In-Wall system is you have to get the variant code, which is on a sticker somewhere on your H-column and d*mn difficult to find. That’s the only way to know exactly what replacement parts you need to order for your system.
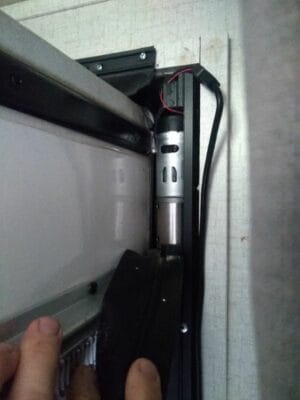
The other annoying thing about a Schwintek system is it’s a bear to move manually. The Owner’s Manual says you can unplug the motors from the controller, which releases the built-in electric motor brake, and you can just manhandle the room as you please.
Umm … sure. Maybe if you’re Arnold Schwarzenegger. In reality, that rarely works, even with slide-outs in good condition. And it’s practically impossible with a seized spur gear. There’s just too much resistance. I’ve seen four grown men try to move a bedroom slide-out room by hand and give up after 15 minutes; it budged not an inch. And if you must remove the motors themselves, better pray the room isn’t stuck in the retracted position, because the motor retention screw is only accessible from the outside …
So yes, a lot of the blame goes on the design itself. But RV manufacturers aren’t always doing their part, either. I’ve been in rigs where accessing one side of the system would be impossible with the slide stuck in the retracted position. Or where the manufacturer cheaped out for a lightweight Schwintek system for a full-wall kitchen slide-out (yikes!) instead of spec’ing out a heavy-duty through-frame slide system. More on this in a minute.
Are There Any Alternatives to the Schwintek System?
If you really hate the In-Wall/Schwintek system, you can ask your dealer to replace your Schwintek In-Wall system with a Lippert Slim Rack or Vroom slide-out system, both of which are noticeably superior. Vroom Slide Systems is an independent company based in Tucson, Arizona, and their entire MO is just replacing In-Wall systems!
But if you need to live-and-let-live, here are some tips for maintaining your Lippert In-Wall Schwintek slide-out system.
#1 Count Your Floor Rollers

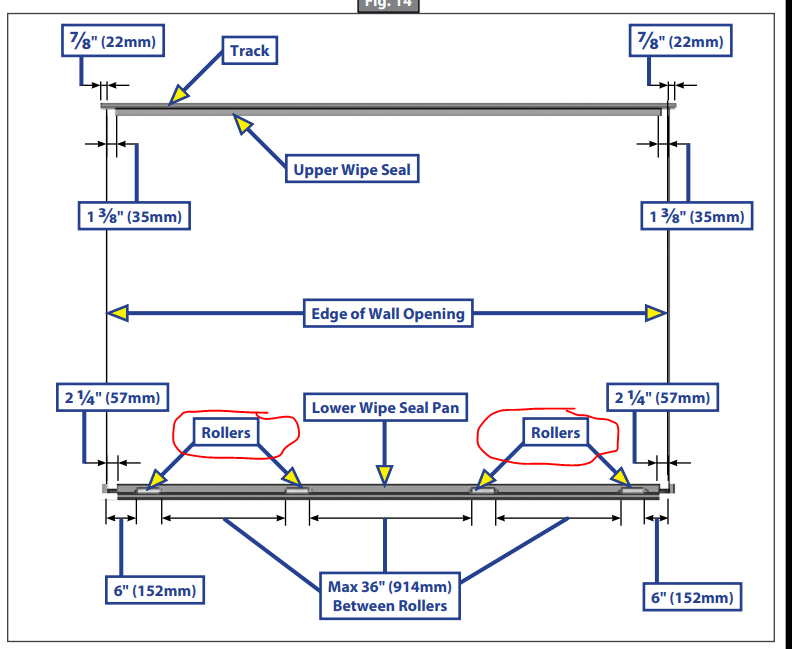
It’s a common misconception that the gear racks on the side of the slide-out box are what hold the weight of your slide-out room. That’s not true. Most of the weight of the slide-out box is actually resting on hidden rollers installed below!
You can read the OEM installation requirements here. Long story short, Lippert has strict requirements for RV manufacturers to guarantee sufficient wall and floor strength – but it’s up to the manufacturer to comply. In particular, RV manufacturers are supposed to install floor rollers within 6” of the corners and not more than every 36” spacing between rollers. Now, do you think this happens 100% of the time?
Count your floor rollers. You can see them if you bend away your floor wiper seal. If they don’t meet spec, contact your RV manufacturer and raise hell.
(You might also check your outriggers. I came across one slide-out room that failed because a roller broke through the floor, where there was almost 6 feet of space between outriggers!)
#1: Sync Your Slide-Out Every Time!
The Lippert In-Wall (formerly Schwintek) slide-out system has a controller that is smart enough to detect when the in-wall motors are drawing more amps (i.e., more power). When the controller sees amps spike, it assumes the slide-out is at the end of its mechanical travel, and it will shut down the motors to prevent damage.
All well and good – except that you’re probably interrupting the controller “brain” in the middle of its thinking process! Unlike other slide-out systems, you’re actually supposed to hold down the EXTEND/RETRACT Slide-Out button until the controller shuts down the motors on its own. I know, I know – it’s backward from the usual SOP. (Don’t try this with a through-frame slide-out!) This is called “syncing,” and it allows the controller to work with the Hall effect sensors to keep both sides moving simultaneously.
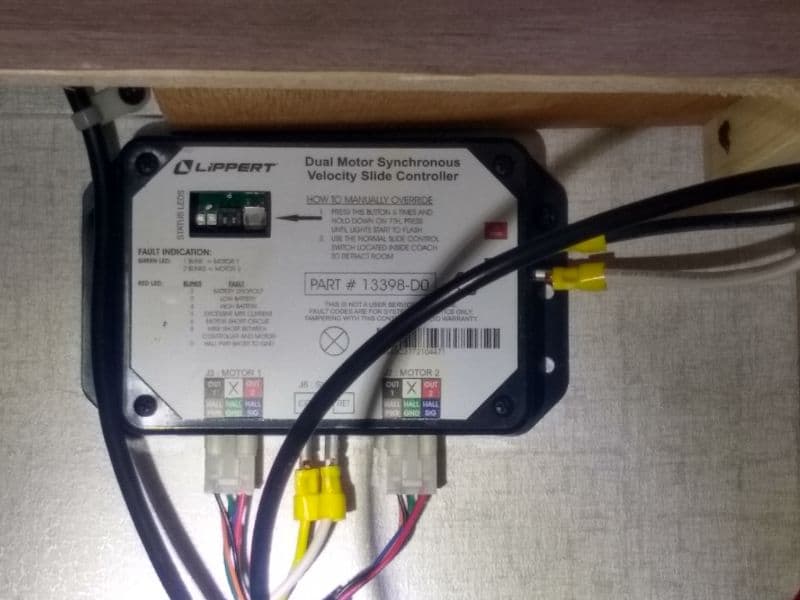
When you release the switch too quickly, the controller doesn’t get a chance to synchronize the motors. Over time, one side of the slide-out room begins to move before the other, and gears start binding, bearing blocks get bent, leading to all kinds of mechanical mayhem. Like I said, it’s a finicky system.
So let the controller do its job. Hold down the EXTEND/RETRACT slide-out switch every time you use the slide-out until the controller shuts down the motors on its own.
Note that synchronizing restores side-to-side motion. If your slide-out isn’t properly closing top-to-bottom, you may have a timing issue (such as a skipping gear tooth), which requires a complete removal and reinstallation of the slide-out mechanism on that slide. Bad news, I know.
#3: (Possibly) Lubricate Your Bearing Block Shoe Race
Fair warning: I’m just passing along this information. I don’t have enough hands-on experience to either confirm or deny. But this gentleman, Darren Koepp, is a master RV technician and former systems engineer with many years of field experience. He steadfastly recommends that you lubricate the bearing block shoe race in the Schwintek gear track. See the video below for more information.
#4 Double-Check Your Slide-Out Seals
I’m of the opinion that slide-out seals are water-resistant, not necessarily waterproof. If you’re a full-timer or seasonal camper, I really think you should invest in some awning toppers.
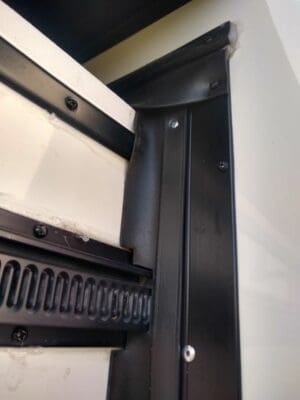
Either way, keep an eye on your slide-out seals – especially the top corners! Per Lippert’s requirements, the top wiper seal must overlap and be glued to the vertical wiper seals. It’s not uncommon for that corner joint to become unglued or damaged. Reglue or replace the seals if that happens.
#5 Double-Check Your Fascia Boards
It’s rare, but sometimes the In-Wall motors can actually produce too much torque for your particular RV construction. When the room is fully extended, the fascia boards around the slide-out room jam against the sidewall, sealing the room. If your fascia boards weren’t installed or designed correctly, they can bend or break over time. So just double-check twice a year that the fascia is in good condition, nice and square.
Is the Schwintek System As Bad As They Say?
Like I said, I’m not in love with the In-Wall system either. But other slide-out mechanisms have their problem too. Before you damn your Schwintek system to a special circle of hell, make sure you’re following the maintenance instructions.
Leave a Reply