Recently, I replaced the house batteries on a Class C motorhome. What would normally be a routine maintenance item turned into a miniature masterclass on RV battery maintenance. Here is the Spark Notes version:
My customer wanted to upgrade his flooded RV/marine lead-acid batteries to modern AGM deep-cycle batteries. He’d be the first to admit that he’d neglected his old house batteries, and as you can see in the pictures below, the batteries were certainly showing their age. Like many RVers, he usually camped while connected to shore power, so the house batteries were rarely taxed except during transit.
What Causes RV Battery Lug Corrosion?
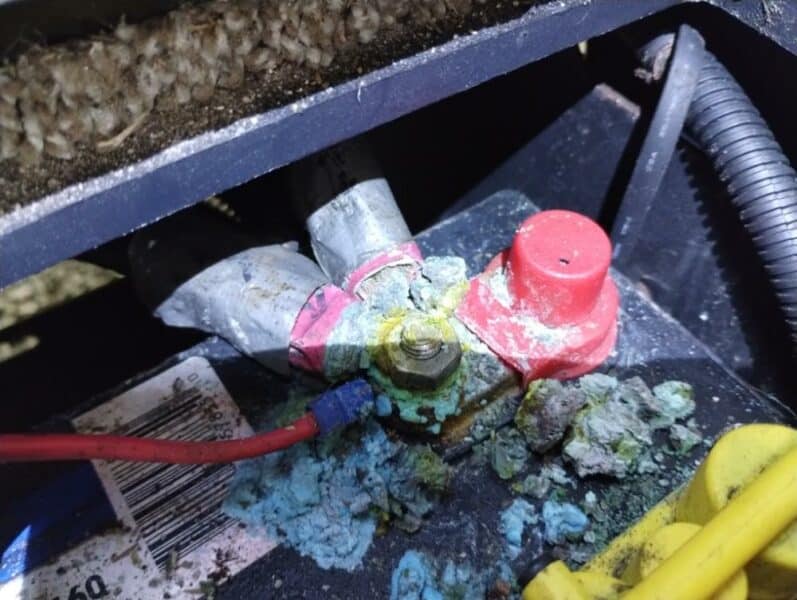
It’s a common misconception that the white-green powdery or flaky stuff on the battery terminals is just normal corrosion. That’s not exactly true. When copper oxidizes in the atmosphere, it forms a protective greenish patina (think of the Statue of Liberty). But that powdery stuff is actually some blend of other oxidative compounds like copper sulfate, and it’s formed when the copper reacts with escaping hydrogen gas or leaking sulfuric acid from the batteries. Translation: The copper gets actually eaten away.
If you see significant levels of battery terminal corrosion on your batteries, that’s an immediate call for battery maintenance. You need to A) check your electrolyte levels if possible and B) verify that the converter/charger is not overcharging your battery.
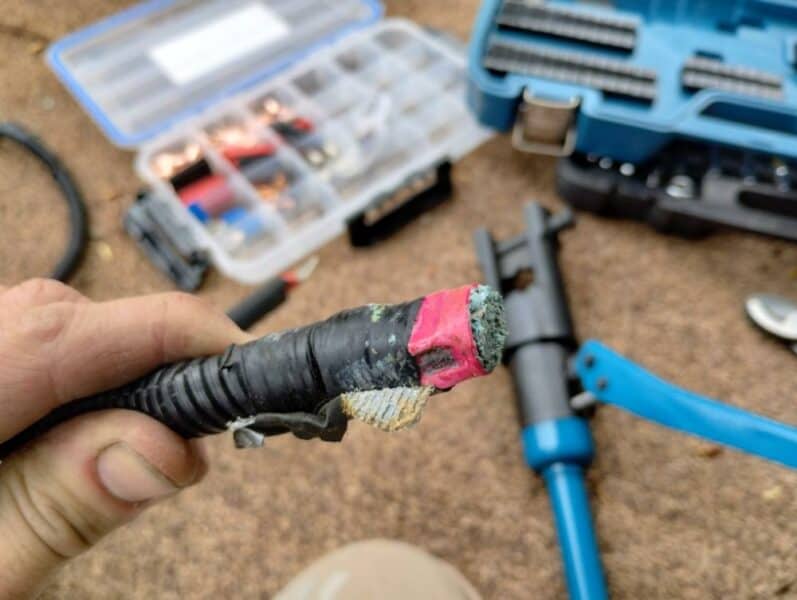
In our case, we were too late. Half of the terminals were so corroded they snapped in half when I tried to remove them. Most of the others I didn’t trust, not knowing how deep the corrosion had infiltrated the wire strands themselves. Even though a proper crimp on stranded wire is supposed to be gas-tight, that’s often not the case with RVs, and in our case, the OEM had used battery terminals with open barrels, not fully closed, so that didn’t earn my trust either. However, I was able to salvage a few wire terminals with a wire brush and a simple vinegar-salt cleaning solution.
How to Replace Corroded RV Battery Terminals
Long story made some what short: I had to replace most of the wire terminals and lugs. This isn’t a DIY job, mostly because I use a 16-ton hydraulic press to crimp marine-grade tinned copper lugs onto the stranded wire ends, and that’s a $300 tool. In my experience, working with wire and cable above 10-guage requires special tools to cut, crimp, solder, and splice. I spent $50 on a proper Jonard pocket cable stripper just to avoid the danger of using a $5 utility knife to strip the cable jacketing!
I also use a portable butane torch to heat the heat-shrink tubing (I prefer double-wall heat shrink tubing with a 3:1 shrink ratio). On the rare cases that I don’t have heat shrink available, I can also use two half-lapped layers of Scotch 2242 rubber splicing tape beneath two half-lapped layers of 3M 33+ vinyl tape for a permanent watertight splice, but that’s pretty bulky.
Lastly, I use dielectric silicone grease to protect the electrical connections from future oxidation. You can also use CRC Battery Terminal Protector spray, heavy-duty grease, or a similar product to protect the terminals. Do not use anti-seize, which is electrically conductive. It’s been known to melt in high heat, trickling from a positive terminal to chassis ground, where it causes a direct short.

And no, for those of you wondering, dielectric grease does NOT appreciably increase the electrical resistance of a tightened electrical connection. People far smarter than me have tested this hypothesis, and the scientific consensus seems to be that the dielectric grease (which is an insulator) is pushed out of the metal-to-metal contact areas. It’s squeezed into the tiny voids between metals, which displaces and prevents any trapped moisture. Of course, this only works if the connection is properly tightened, so don’t forget that torque wrench!
When It Comes to Corroded RV Battery Lugs, Sweat the Details!
Paying special attention to battery connections is worth the hassle. Small increases in contact resistance have a cumulative effect; in a sloppy installation, one battery can easily be overtaxed and overdrawn.
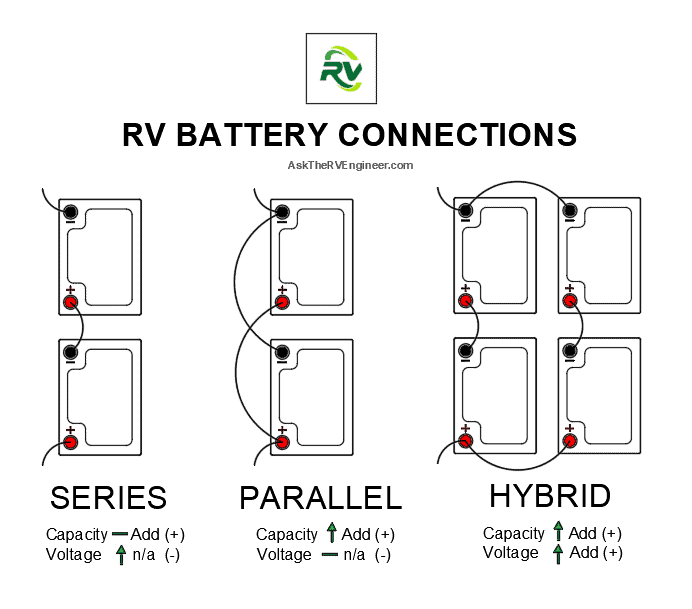
In this particular installation, we used two 12V batteries wired in parallel for double the amperage capacity. The RV manufacturer had also added a pass-through inverter to power a residential refrigerator. Unfortunately, those cables connected directly to the positive and negative posts of a single battery, rather than across the battery bank (negative at one battery, positive at the other) as recommended.
>>> READ MORE: Are 6-Volt Golf Cart Batteries Really Better for Your RV House Batteries?
After a few hours of cleanup and careful crimping, the installation was good as new – or dare I say, even a little better! Not perfect, of course. I can’t say I was a huge fan of the aluminum-bodied ratchet straps; I would have liked to see plastic instead. To further reduce potential corrosion (and short circuits), you can install felt washers beneath the terminals (I didn’t have the clearance) and add rubber caps on top.

Leave a Reply