A gross lie has been perpetrated upon the RV community. The lie is: “Your trailer umbilical cord will charge your RV house batteries. You don’t have to do anything but drive!”
The full width and breadth of the myth goes something like this:
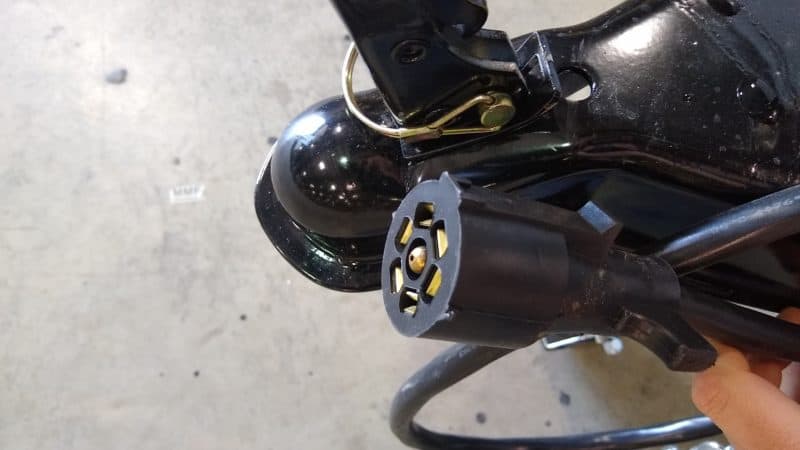
- You plug your towable RV into your tow vehicle with the 7-way* umbilical cord connector.
- There’s a wire (of undetermined gauge) between the 7-way receptacle and the tow vehicle alternator.
- When you turn on your tow vehicle, it kicks on the alternator.
- The alternator charges both the tow vehicle’s starter battery and the RV’s house battery.
But here’s the truth of the matter:
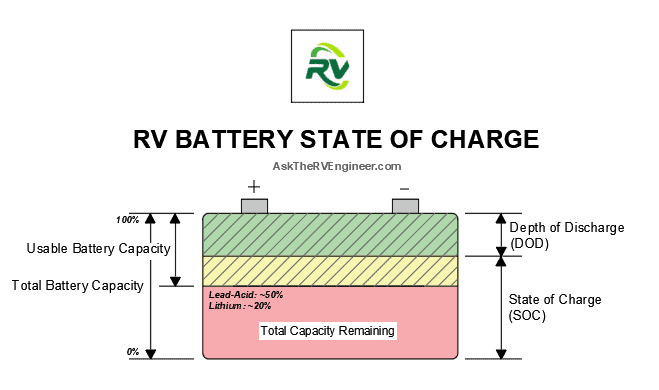
Most of the time, a tow vehicle will only “charge” an RV house battery up to 80 percent of charge, which means about half the useable capacity!
If this flies in the face of all you hold dear, let me break down exactly why this happens.
I’ve answered this question in brief in Part 2 of “What Are My RV Battery Life Power Needs?” and “The Ultimate FAQ Guide to RV Lead-Acid Batteries,” but it deserves a more thorough explanation. Let’s dive in.
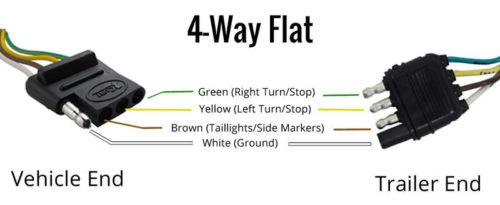
*The 4-way flat connector typically found on small utility trailers doesn’t have an auxiliary charging line.
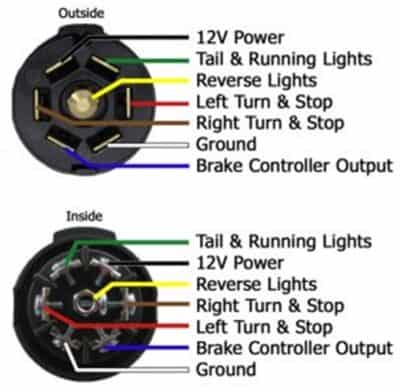
Here’s a diagram of a typical 4-way flat connector vs a 7-way round connector.
7-Way Connector Wiring Diagram
4-Way Connector Wiring Diagram
Problem 1: Voltage Drop Along the Wire
A wire runs between your alternator and your 7-way plug.
(Actually, in some cases, there isn’t! If your 7-way receptacle was installed aftermarket or by a previous owner, there’s no guarantee that anyone fished that wire. If you’re not getting any power from your umbilical cord, confirm the receptacle is wired correctly!)
I don’t know the size of your wire. It could be 14GA, 12GA, or 8GA. But here’s one scenario where size matters!
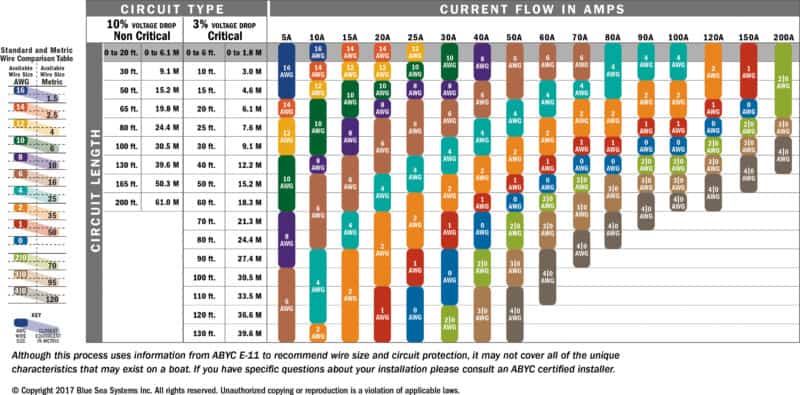
You see, wires lose voltage due to resistance. The longer and smaller the wire, the worse the voltage drop (voltage, remember, is the electromotive force, the pressure, that “pushes” electricity through a conductor). Without voltage, electricity can’t move!
Using this handy-dandy calculator, what’s the voltage drop of an 8GA copper conductor after 25 feet at 13.8V and 10A? In other words, how much voltage would be lost running an 8GA wire from your alternator about 25 feet back to the 7-way receptacle?
Good news! We only lost 0.3 volts! That’s just 2.3 percent!
Now, let’s try it again with a 14GA wire.
… ooh. That’s not good. We lost 1.3 volts, or almost 10 percent. Our voltage at the receptacle (where we plug in our trailer) is now just 12.5 volts.
And no lead-acid battery can be fully charged at 12.5 volts. It’s outside the laws of battery chemistry. You need at least 2.15 volts per cell, or 12.9 volts for a “12V battery,” to get a meaningful charge.
12.9 volts is the minimum “trickle charging” voltage for most lead-acid batteries. 13.2 volts is better. If voltage drops at the battery to less than 12.9 volts, you won’t charge the battery!
To some degree, a system self-regulates by decreasing the amperage, which decreases the voltage loss. But that comes at a cost: speed. The smaller and longer the wires, the longer it will take your battery to charge – if it charges at all!
Translation? Unless someone used a big, fat wire between your alternator and your trailer receptacle, you won’t get a significant charge out of it!
…. And!! … we’ve only talked about the tow vehicle half! We haven’t talked about the wire in the umbilical cord itself, the wire jumper to the house batteries, plus all the terminals and connectors. Every single element will increase the voltage drop.
Other sources of voltage drop include:
- Corroded battery terminals
- Corroded connectors and splices
Problem 2: The Voltage Output from the Alternator
I’ve been referring to the “alternator” as if it was the solo star of the show. But the truth is that by itself, the alternator is kind of dumb. It needs a smarter sidekick. And it has one: the voltage regulator.
Your voltage regulator controls the output voltage from your alternator. Your voltage regulator might be an internal component to your alternator, an external component, or part of your Engine Control Unit (ECU). Think of the regulator as the electrical traffic controller.
The job of your car’s voltage regulator is (you guessed it!) to recharge the car’s battery and power the car’s electrical systems. That means it’s programmed to charge a flooded lead-acid starting battery from a shallow discharge of 5-20 percent.
But if you read my ultimate guide to RV lead-acid batteries, then you know that RV batteries are usually AGM deep-cycle batteries routinely discharged down to 40-50 percent.
Deep-cycle AGM and flooded starting batteries are similar in construction but not the same! And they aren’t charged using the exact same algorithm.
Charging an AGM battery with the charge profile of an automotive starting battery is like using a straw to eat soup. It works (kinda), but it’s not recommended. And you’ll leave a lot left in the bowl.

The big difference is that AGM batteries are charged at a higher voltage during the absorption phase. When your battery hits about 80 percent state-of-charge, a smart 3-stage charge would enter the absorption or the acceptance phase. Charging voltage should jump up to 14.5 to 14.8 volts for the duration of charging.
And … therein lies the problem! A typical automotive regulator has a maximum voltage setpoint of 14.0 to 14.5 volts. That’s not high enough to charge an AGM battery during the absorption phase.
Translation: Best-case scenario, most tow vehicles cannot charge your house batteries more than 80 percent!
That’s why many people say a trailer connection “maintains” a battery; it doesn’t truly charge it. At best, it functions as a trickle charger.
Even if you’re using good ol’ wet lead-acid batteries in your RV, you’re not out of the woods! With enough voltage loss, an alternator/regulator can’t even charge a typical lead-acid battery up to full capacity.
There’s also the argument that modern-day “smart” variable-voltage alternators are programmed to run only when necessary to charge your vehicle’s starter battery. Smart alternators can take a long, loooooong time to charge RV house batteries!
Problem 3: Insufficient Battery Useable Capacity
I revisited this problem in-depth in my article, A Geek’s Guide to Murder Your Battery.
Unless you’re running lithium batteries, most deep-cycle batteries can be discharged down to about 50 percent. So if you have a 100-Ah battery, you can safely discharge it to around 50-Ah. Any lower than that, and you’ll:
- Potentially reduce the maximum capacity of your battery
- Significantly reduce the battery lifespan
- Risk freezing the battery in frigid temperatures
Do you see the problem here? If your tow vehicle can only charge your battery up to 80 percent capacity …
… And you can only discharge your battery down to 50 percent capacity ….
Then you only have 30 percent useable battery capacity left! So your 100-Ah battery, “fully charged from your tow vehicle,” is really only good for 30-Ah!
An evening of boondocking can drain those 30 amp-hours in a hurry. And this is a best-case scenario! It’s not uncommon to check your battery state-of-charge after a full day of driving only to find that the batteries have only charged to 60 or 70 percent capacity. Subtract 50 percent from whatever you have, and that’s how much useable capacity you have left.
If you want to learn more about RV batteries, I recommend starting with Part 1: Guide to Your Battery Power Needs.
Important!: At the risk of insulting your intelligence, never leave your RV house batteries connected in parallel with your car starting battery. Some charge will be transferred between the two, which could reduce the voltage in the starting battery so much that it can’t start your car!
This is more common than you might think. Many travel trailers aren’t wired with a battery isolation solenoid (BIM). If you leave your travel trailer plugged into your tow vehicle, you risk draining one to feed the other.
Thankfully, if you encounter this problem, you can purchase a battery isolator for about $20, and you can easily wire it yourself.
Some trailers are wired so the auxiliary battery charging cable runs through the battery disconnect switch, which can also shut off flow between the vehicles – but it will also shut off all battery power to your camper!
Solution: DC-to-DC Battery Charger!
You could, I suppose, go to all the work of rewiring your tow vehicle and trailer to minimize voltage loss and adjusting the voltage setpoints of your voltage regulator in the ECU.
Or …
You could just install a DC-to-DC charger.
Don’t let the terminology scare you. A DC-to-DC charger works exactly like a battery charger you plug into the wall – only instead of plugging into the wall, it connects to your starter battery and alternator. It’s a true 3-stage charger, providing bulk, absorption, and float stages.
These chargers are also known as battery-to-battery or B2B chargers. They use electronic wizardry to boost the input voltage to a high enough output to correctly charge an auxiliary battery.
Most of these chargers are onboard, meaning they are permanently installed in your tow vehicle. They are configured to prioritize the starter battery, so they won’t sacrifice one to juice up the other! You’ll probably need to run new wiring back to your camper, too.
Trustworthy brands include:
- Redarc
- Renogy
- Victron
You can’t go wrong with any of these brands. One’s Australian, one’s American, and one’s Dutch. Redarc leads the industry standard.
DC-to-DC RV chargers cost anywhere from $100 to $500, with most being $250 to $400. The bigger the charger amp rating, the more expensive.
You’ll also pay extra for features like Bluetooth connectivity, multi-chemistry battery profiles, dual input (e.g. battery and solar), and fault recognition. High-quality B2B chargers, like Redarc, are even compatible with variable-voltage smart alternators.
When picking a size, choose a DC-to-DC charger rated around one-quarter the size of your battery bank. If you have a 220-Ah battery bank, for instance, choose a 50A battery charger.
There is a big downside to DC-to-DC onboard chargers. You need to drive for some time (at least 30-40 minutes) to get a meaningful charge on your auxiliary battery. If you’re a “staycation” kind of RVer, perhaps you should look into solar panels instead.
Fun fact: There are combination B2B and solar charge controllers!
And That’s a Wrap!
You don’t have to struggle with poorly charged batteries during all of your trips. If you want to truly charge your RV batteries while towing, buy a DC-to-DC charger.
Otherwise, just understand that the standard setup does little more than “maintain” your battery at up to 80 percent of capacity. If you’re a boondocker, do yourself a favor, and upgrade to a DC-to-DC charger!
Leave a Reply