Nothing strikes more fear into the heart of an RVer than the sentence, “RV fiberglass wall delamination.”
You’re probably reading this article because someone glanced at a bubble on your sidewall, shook their heads, and commended your soul to God.
You’re wondering if it’s possible to repair a delaminated RV sidewall or front cap. What causes delamination in the first place? Will you have to take out a second mortgage? Will RV insurance cover delamination?
I won’t lie to you – delamination is bad news. But don’t call the scrap yard just yet. Let’s see if we can fix it.
What Is RV Wall Delamination?
Delamination is just a fancy term for “separation.”
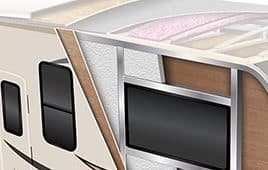
It’s a problem unique to laminated fiberglass RV sidewalls, which are used in most modern RVs. Fiberglass sidewalls are made from a sandwich of fiberglass, foam, and paneling. These layers are glued and pressed together, like an Oreo. When those layers begin to separate, you get “delamination.”
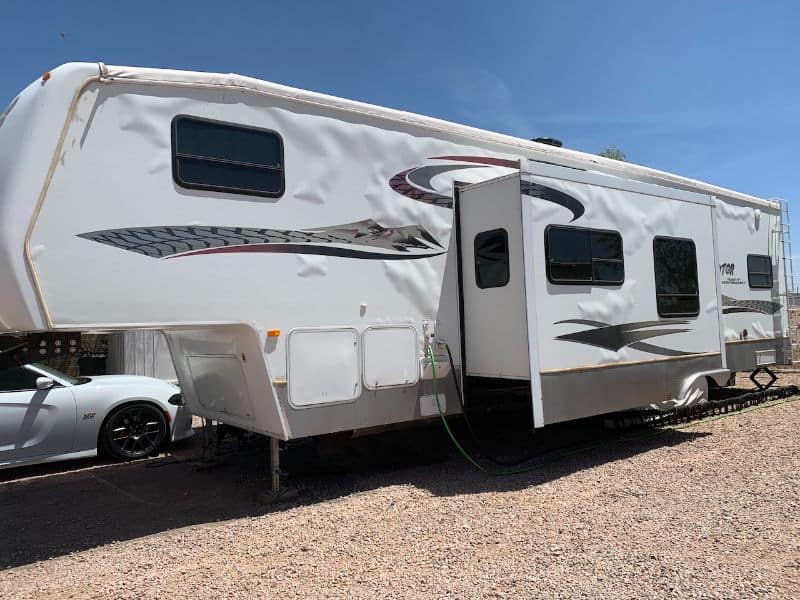
You can also see delamination along a travel trailer or 5th wheel front cap (which is why so many RVs now use molded fiberglass caps, which don’t delaminate).
Delamination usually pops up between the gel-coated fiberglass and the backer layer, often made of cheap, lightweight lauan plywood.
Another common location is within the lauan plywood itself! The plies (layers) of the plywood can peel away from each other (this is an $8 sheet of plywood, after all).
To make matters confusing, there isn’t one type of “fiberglass RV.”
The term is also used for:
- Molded fiberglass campers, which have a solid structural fiberglass shell.
- Fiberglass hung wall campers, which have a solid, rigid sheet of fiberglass hung (not laminated) to the sidewall structure.
So I apologize for any confusion. But unless you’re buying an Entegra or Newmar Class A coach, or a Casita or Scamp mini travel trailer, you probably don’t own a “molded” or “hung wall” fiberglass camper.
Delamination isn’t an affliction for conventional stick n’ tin trailers, which have corrugated aluminum siding hung on a stick-built frame. They have their own problems.
If you want to learn more about how laminated fiberglass walls are made, I wrote the ultimate guide to RV sidewall construction methods.
What Causes RV Sidewall Delamination?
Delamination occurs for one of three reasons:
- Manufacturing defect
- Water leak
- Hard impact
Let’s go through these culprits in more detail.
1. Manufacturing Defect
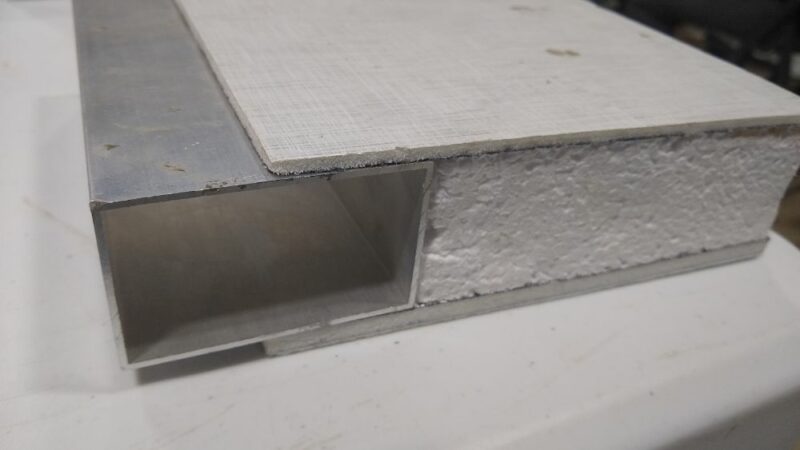
In a fiberglass wall, there are at least four layers:
- The exterior gel-coated fiberglass
- The exterior fiberglass substrate
- The core foam layer
- The interior paneling
By itself, fiberglass sheet is thin, wavy, and flexible. No good for a sidewall. So RV manufacturers bond the thin fiberglass sheet to a stiffening substrate, usually either:
- Lauan plywood
- Azdel
Of these two, Azdel is by far the superior material. Unlike lauan, it cannot rot, and it does not absorb water.
If the bond between the fiberglass sheet and backer substrate (Layers 1 and 2) gives up the ghost, then the thin fiberglass exterior can become wavy or bubbly.
In more rare instances, the substrate can delaminate from the core foam layer (Layers 2 and 3). This is a significant cosmetic and structural problem.
So what could cause this glue bond failure?
Oh, take your pick. Insufficient glue, inadequate bonding pressure, excessive humidity, a batch batch of adhesive, uncleaned surfaces, it was Friday at 2:30 p.m.
Manufacturers don’t test laminated sidewalls with non-destructive methods (that would be extremely expensive). Generally, once the walls come off the production line, they are assumed “good to go.” If there is a hidden problem, it usually won’t show up until YOU own the RV.
But here’s the good news.
After producing laminated fiberglass walls for 40 years, the RV industry has a pretty good idea of how to make them. They aren’t perfect. But you really don’t see the massive delamination failures common to RVs in the 80s and early 90s.
(And if you can get a laminated fiberglass wall made with Azdel, even better!)
2. Water Leaks
Water leaks are the usual suspects for a delaminating sidewall or front cap. Here’s how the theory goes:
- Water penetrates the sidewall at the roof edge or a sidewall cut, such as around a window or stereo hole cut-out.
- The water wicks through the laminated layers, especially if the fiberglass is bonded to plywood.
- The water dissolves or causes the lamination adhesive to give way.
- The fiberglass exterior pulls away from the substrate, causing bubbles and ripples.
The obvious solution is to keep water out of the sidewall! This means religiously inspecting your roof and wall sealants, especially around roof vans, edge moulding, and windows.
- I wrote a big, fat guide to caulking and sealing the outside of your RV that you might find helpful.
- And all about common sources of RV roof leaks.
- And I even wrote a pretty exhaustive list of my favorite caulks and sealants for the job!
3. Hard Impact
Occasionally, a rock can strike a sidewall hard enough to dent the foam core, but not hard enough to break the fiberglass. This dent leaves a void between the styrofoam core and the exterior substrate.
Voids are bad. They form pockets that can capture water. They concentrate stresses. A bubble will form over the dent and slowly grow as the wall flexes with use.
If you see spiderweb cracking over a bubble, that’s a potential sign that road damage caused the delamination.
What Are Signs of RV Delamination?
Visual Cues
To paraphrase Dr. Seuss, “It started in low, and it started to grow!”
- Bubbling
- Ripples
- Creasing
- Waves
- Spiderweb cracking
All can be signs of delamination. If you sight down your wall and see any sort of visual imperfection, that might be a sign of separation.
If you don’t spot these warning signs quickly, the blemish will continue to grow. Before long, that little bubble becomes a bulge, and that ripple becomes a crease.
You should inspect your sidewalls in broad daylight or with an LED light.
Tactile Clues
If you push anywhere on your wall and it feels “soft,” you likely have delamination. A completely bonded wall should feel thick and solid, with very little give.
If you can feel ridges or creases, that is also a clue that something is amiss.
Sound Clues
If you thump on a section of your wall and it sounds hollow, that could mean delamination. A hollow wall could indicate a void between the fiberglass and the core.
How to Repair a Delaminated RV Sidewall?
Fixing the Wall Itself
Hmm hmm, how indeed?
Well, let’s start with some honesty. If your wall looks like this:
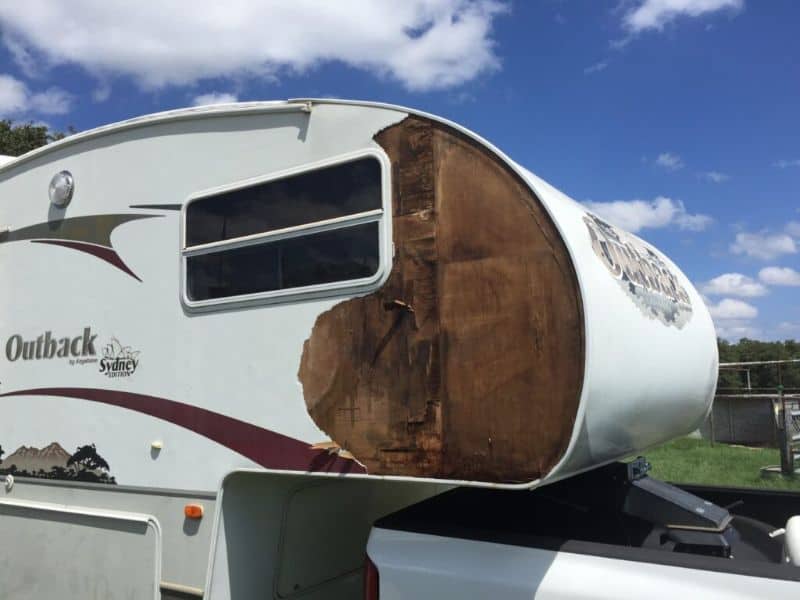
There’s no amount of redneck engineering that can fix this. It’s toast. It’s done for. It’s gone to be with the Lord. You’ve got nothing but the hope of a miracle.
But you probably have something that looks more like this:
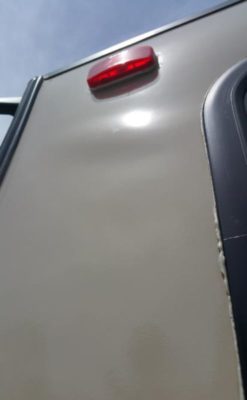
That, my friend, is much more manageable. You are in need of an RV delamination repair kit. They cost $75 – $250, on average.
There are many kits on the market. They all work on the same premise:
- Insert an adhesive (usually epoxy) beneath the failed area.
- If necessary, cut a slit or “X” in the fiberglass to fold it down flat.
- Apply pressure. Let the adhesive cure.
- Repaint or restore the gelcoat.
It sounds easy. But restoring a delaminated wall to factory-like condition is actually pretty difficult. You will need the skills of an autobody repair shop.
If you’ve never worked with epoxy resin before, you’ll find the DIY repair kits to be a bit like your high school science fair project. You need gloves, mixing containers, syringes, injection tubing, etc.
Because epoxy resin immediately begins curing once mixed with a hardener, you can only work in small batches (read: small areas). So if you’re planning to restore an entire sidewall, you’re looking at weeks of work!
Plus, clamping the affected area can be challenging. You’ll need to apply force on the vertical walls. And no, a roller won’t do. You need sustained pressure for at least several hours, like ratcheting spreader bars or pipe clamps. You’ll probably need to park your RV next to a fixed structure, like a building wall or a tree.
And don’t even get me started on painting and refinishing. Restoring a gel coat finish is best left to boatbuilders, not DIY RV owners. If you’re willing to take on the challenge, you’re more a man than me!
- Small repairs can be (somewhat) easily fixed with an RV delamination repair kit.
- Larger repairs can require dozens, even hundreds of hours of work! Not worth it.
Plus, the repair may not last more than a few years. It’s very difficult to squeeze epoxy into all the voids. Eventually, a small void may set off another delamination chain reaction!
If you’re still game to fix your own RV sidewalls, then this is one of those situations where a picture is worth a 1,000 words.
Here’s a great How-To delamination repair guide from full-time RVer Brian at RV with Tito! And an instructional video to boot!
Fixing Other Damage
Fixing the delaminated sidewall is only half the battle. Intruding water may have damaged other parts of your RV.
What I’m talking about mostly is mold and mildew. A little bit of water, a little bit of heat, and you’ve got a big mold problem on your hands.
A delaminated sidewall can cause water damage and mold in the following areas:
- Behind the interior paneling on the opposite side of the wall
- Along the edges of the floor beneath the delam bubble
- In any wooden wall structure, such as 2×2 lumber around window openings
If the delamination was caused by a roof leak, then all bets are off. The water could have flowed almost anywhere. You’ll need to perform a top-to-bottom RV inspection. As the saying goes, ““The worst leak you’ll ever have is the one you can’t see.”
If you suspect subfloor damage, my guide to RV subfloor types might help you sleuth out the problem.
If you do find mold, don’t despair! Read this guide to RV indoor air quality, mold and mildew. Then take a deep breathe (hmm, poor choice of words), and soldier on!
How Much Does It Cost to Repair a Delaminated Sidewall?
A severely delaminated sidewall or front cap is normally considered a total loss.
The only fix for a sidewall that looks like a rumpled blanket is a complete exterior wall replacement. This means disassembling and re-assembling most of the RV.
This is like open heart + a new spine surgery, guys. It’s huge. RV manufacturers will often “swap units” – offer you a brand-new RV – rather than fix a badly delaminated sidewall. By the time an RV looks like this (see below), you likely have water damage to your furniture and subfloor, too.
If your RV is salvageable, a professional repair can cost at least $1,000. And that’s assuming you’re looking at a few dinner plate-sized bubbles. As the affected are grows, so does the bill. At some point, it just doesn’t make sense to spend umpteen thousands in repair bills.
One final (but very important!) note: If your RV is new-er, and you’ve properly maintained it, then reach out to your manufacturer. I don’t care if you’re “out of warranty.” If your 2- or 3-year-old RV is delaminating even with proper maintenance, I think your manufacturer owes you a replacement, fine print be damned. No one deseves a lemon.
How to Prevent RV Wall Separation?
An ounce of prevention is worth a pound of cure!
Since many delamination failures start with leaks, start there!
- Maintain your exterior seals.
- Store your RV under a cover.
- Inspect your RV at least once a year.
RVs stored or used in extreme conditions may require more frequent inspection and maintenance. If the environment is extremely hot or humid, inspect your RV at least every 4-6 months.
If you find a leak, fix it! (And no, I don’t mean duct tape.) Do it once; do it right. I wrote a big, fat guide for maintaining your RV roof and sidewalls here.
The other big “secret” to avoiding RV wall delamination is this: Don’t buy from a crummy brand. Bargain-basement RVs are built fast n’ cheap. You get what you pay for. There’s no guarantee the manufacturer is using a high-quality lamination adhesive or reliable bonding process.
Does RV Insurance Cover Delamination?
Bad news, folks. RV insurance and extended service warranties generally don’t cover delamination.
This is because insurance agencies consider delamination preventable with proper maintenance since it’s often caused by water damage.
But “generally” doesn’t mean all of the time. If you can prove (or an adjuster can prove) that the delamination is a manufacturer’s defect, you’ll likely get the damage paid for. That can be hard to prove, though.
There ARE a few companies that provide comprehensive insurance coverage to pay for delaminated sidewalls. I’m not in the insurance world myself, but I’ve heard that Louisiana Farm Bureau Insurance, AARP RV Insurance from The Hartford, and USAA (through Progressive) will cover delamination on certain conditions.
You’ll need comprehensive RV coverage. Comprehensive insurance usually covers damage beyond your control, such as theft, vandalism, fire, broken glass, and weather-related incidents. Note this is comprehensive insurance for your RV, not for your tow vehicle!
RV delamination can feel like the end of the world. And I won’t lie to you – it’s not good news.
Maintain your RV seals. That’s the most important thing. If delamination still happens to you, and you’re on the hook, then fix it yourself. It you can’t, pay someone else to fix it.
If you can’t do that … then just keep RVing! A delaminating RV is on its way to hospice, but it still rolls down the road. As Yogi Berra said, “It ain’t over ‘til it’s over.”
Leave a Reply